This page allows you to compose the work schedule for your registered stores. The schedule allows you to establish the planned working time of your employees, as well as to record the actual working time. You can compose or view work schedules for a month, a week, or a day. You can filter your schedules by stores, period or employee roles.
The following subjects are covered:
Accounting Working Hours
This topic explains main terms and principles of accounting working hours in YUMA back office.
- accounting two types of working hours: scheduled hours of work (for example, an employee must work from 8.00 to 17.00 from Monday to Friday) and actual time worked by the employee (for example, the staff member arrived at 7.45 and left at 17.01)
- scheduled working time is entered manually by the system user (such as a manager) in advance. For example, the manager can specify the following information: next month an employee must work from 8 a.m. till 5 p.m. from Monday to Friday.
- actual working time is entered by employees: they must enter their personal PIN code using any POS terminal:
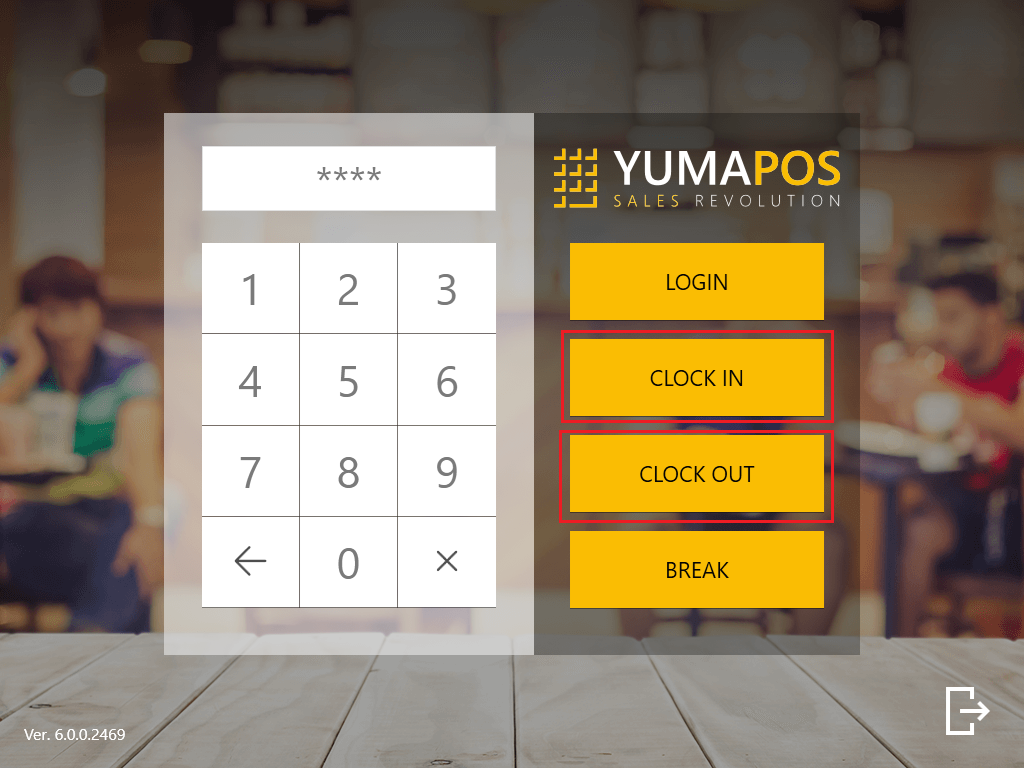
Before starting a shift, an employee enters their PIN and clicks Clock IN.
Before ending the shift, the employee enters their PIN and clicks Clock Out.
- The system automatically analyzes the relationship between scheduled and actual working hours, and outputs the following shift statuses:
- On Schedule: scheduled shifts start 30 minutes before the planned time and ended no later than 30 minutes after the planned time of the shift end.
- Off Schedule: those shifts started after planned time of the shift start, and ended after the planned time of the shift end.
- Skipped: this means that an employee did not open and did not close the shift – in other words, the employee did not enter any information about the shift via POS terminal.
- Out of plan: this means that an employee has worked standard time (e.g. 8 h) and entered information about their shift via POS terminal, though this shift has not been scheduled.
Useful Information About Shift Statuses
When planning the shifts schedule, take into account the following information:
- The scheduled shifts must be set in advance. For example, if a shift is scheduled for tomorrow, you should enter information about the shift no later than today.
The system does not allow you to set a scheduled shift today or in retrospect. - In order for the employee to be recorded as working on a schedule, they must register at POS terminal half an hour before the start of the shift and no later than 30 minutes after its end.
- Please ensure that you informed your employees about the above “half an hour rule.”
- In case of skipped shifts, you should learn a reason (for example an employee might forget to register at POS terminal or even the employee did not work at all).
- Off-plan shifts are typical in business processes. For example, one of the employees got sick and another came to replace the absent employee.
In order for the schedule to work properly according to this concept, you should configure a number of settings in the Back Office – see the following sections.
Viewing Work Schedules
You can create or view a schedule for the selected time period (for example, for a month, week or even for one day) and for specific store.
To view schedule
- In the left pane of the Back Office Management console, click Staff, and then click Schedule.
The system displays a schedule for the current month, for example:

- To display the specific schedule, at the top of the screen set the following filter settings:
- Store: from the list of your registered stores, select the store for which you want to create (or view) a schedule.
- Employee: from the list of employees, select the employee for which you want to create or view schedule.
- Role: from the provided list, choose the employees role to display schedule only for employees with that role.
- Period: specify the schedule period (possible values: week or month).
- Month: select a month.
- Shift status: from the provided list, select the shift status. The system will display schedule only for shifts with specified status. Possible values (table cell colors): All, On Schedule (green), Off Schedule (yellow), Skipped (red), Out of plan (plum).
- Start composing new schedule.
More Information About Schedules
You can customize the schedule view using the filter (see Step 2 of the above procedure).
The current day is always marked in red in the calendar.
Shift numbers recorded via the (/) slot are as follows: number before lines / means the number of scheduled shifts per employee, and the number after lines is the number of completed shifts per employee. The completed shifts include only ones with the following statuses: On Schedule (green), Off Schedule (yellow), and Out of plan (plum).
In the far right column Hours, the planned and actual working hours are shown for each employee. So, for example, if you have a standard 40-hour week, then you can easily see whether there are discrepancies in the planned and actual values.
Composing Work Schedules
Main operations with the schedule are as follows:
Selecting and Unselecting Individual Cells
To add planned shifts to your schedule, you should first click appropriate shifts (cells), and then click Edit Selected:
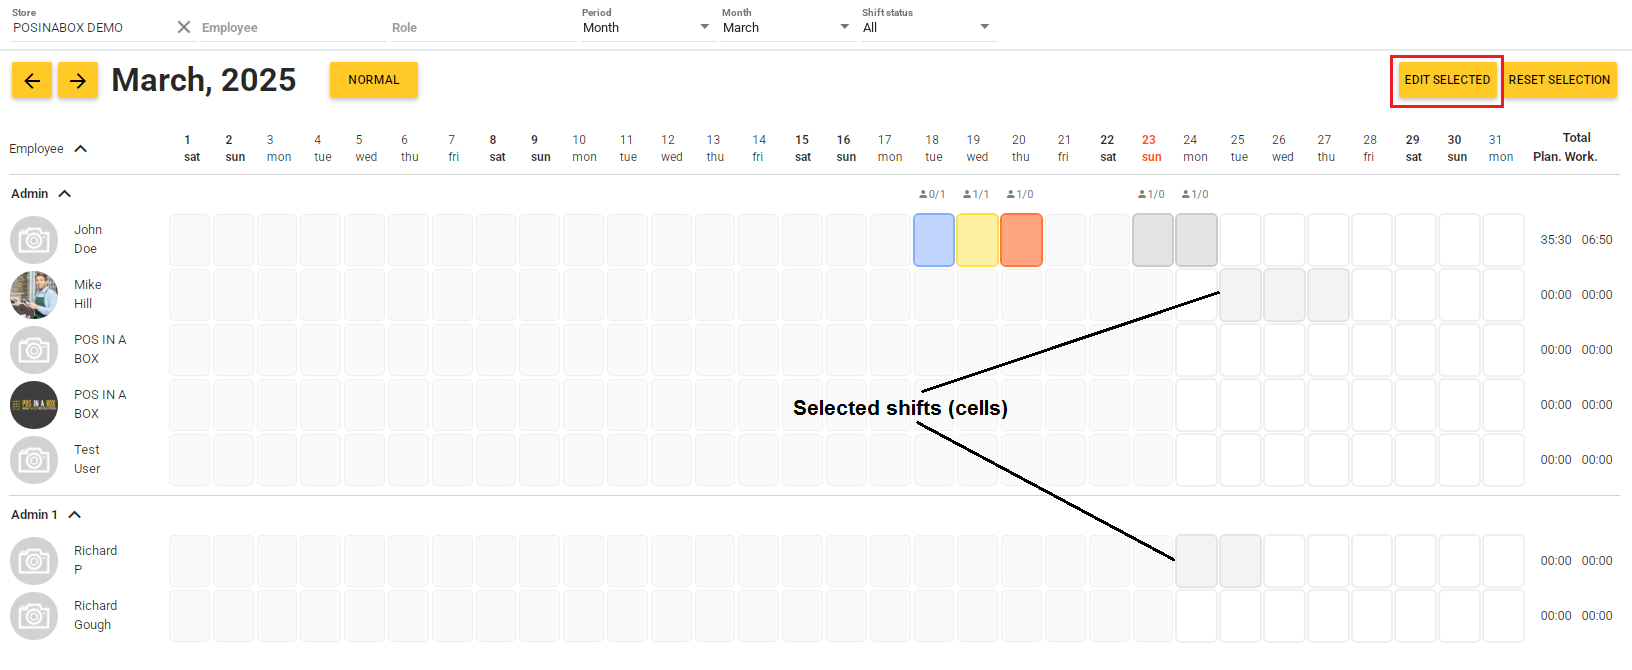
Important: Shifts from the previous period (prior to the current day) cannot be highlighted or edited. You can only view them when the cursor is hovering a cell. For more information, see Updating the Past Shifts Information later in this topic.
Creating Shift Template
For your convenience, it is recommended to create a set of templates for different types of shifts (for example, for night shifts, regular shifts, etc.), which can then be easily used to create schedules.
To create a shift temple
- At the top of the schedule page, click the “+” icon:

- Complete the Add Template dialog box and then click Add:
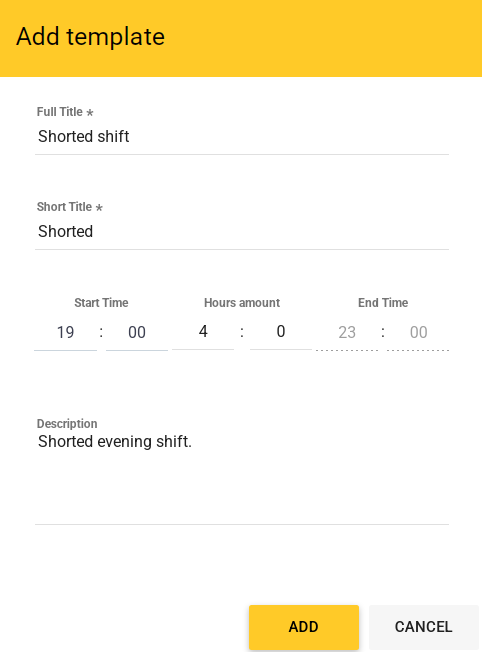
Note: In this dialog it is sufficient to set the start time of shift and its duration – the end time is automatically calculated.
Important: All shift templates are bound to the specific store that is selected in the schedule filter at the time of template creation. You can attach up to 4 templates to a single store.
Operations with Shifts
You can add, edit or delete planned shifts from the schedule. You can also update the past shifts information.
Adding new shift
Before adding a new shift, it is recommended to set filters in the “Store” fields at the top of the schedule window. You can also use “Employee”, “Role”, “Period”, “Month” filters.
To add new shift
- From the schedule, select a cell for desired employee and date, and then click Edit Selected.
This opens the Work Schedule dialog box similar to the following script:
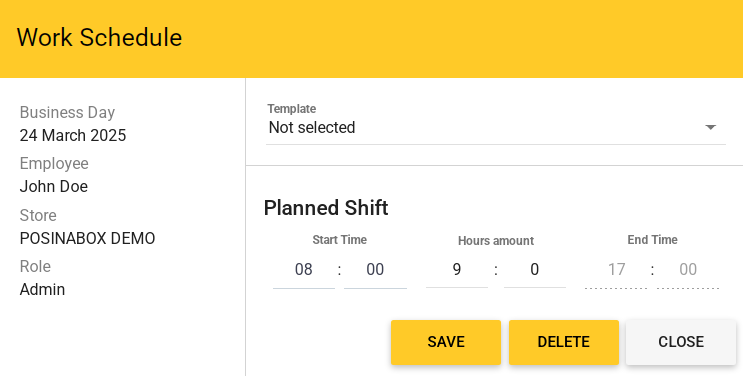
In the left pane of the window some data are pre-filled: date of planned shift, employee name, store name, and employee role.
- From the Template list, select a template or specify the shift start time and duration in the Start Time and Hours amount fields, respectively.
Note: The End Time field is filled automatically. - Click Save.
- Click Save in the top right corner of the schedule page.
Editing Shift
To edit a future shift, complete the following steps:
- Click the shift of interest, and then click Edit Selected.
- In the Work Schedule dialog box (this dialog box is similar to the above described dialog with the same name), update the shift parameters and click Save.
- Click Save in the top right corner of the schedule page.
Important: You can only edit future shifts in this way. For editing past shifts, see. Updating the Past Shifts Information later in this topic.
Note: You can also perform bulk editing multiple shifts. To do this, select the required cells and click Edit Selected. To edit those cells, update the shift information in the Work Schedule dialog as necessary, and click Save. Click Save in the top right corner of the schedule page.
Deleting Shift
Important: deletion of shifts from previous period (past shifts) is not supported.
To delete a scheduled shift (or multiple shifts), use one of the following methods:
- select one or more shifts, and then click Delete in the top right corner
OR - select the desired shift, open the shift by clicking Edit Selected and then click Delete.
Updating the Past Shifts Information
The back office does not allow you to select shifts for the previous period (past shifts). You can only view such shifts, and also edit shifts in any status except “Skipped” (cells of such shifts are highlighted in red).
To edit past shifts
- Double-click the desired past shift.
This opens the Work Schedule window similar to the following screen:
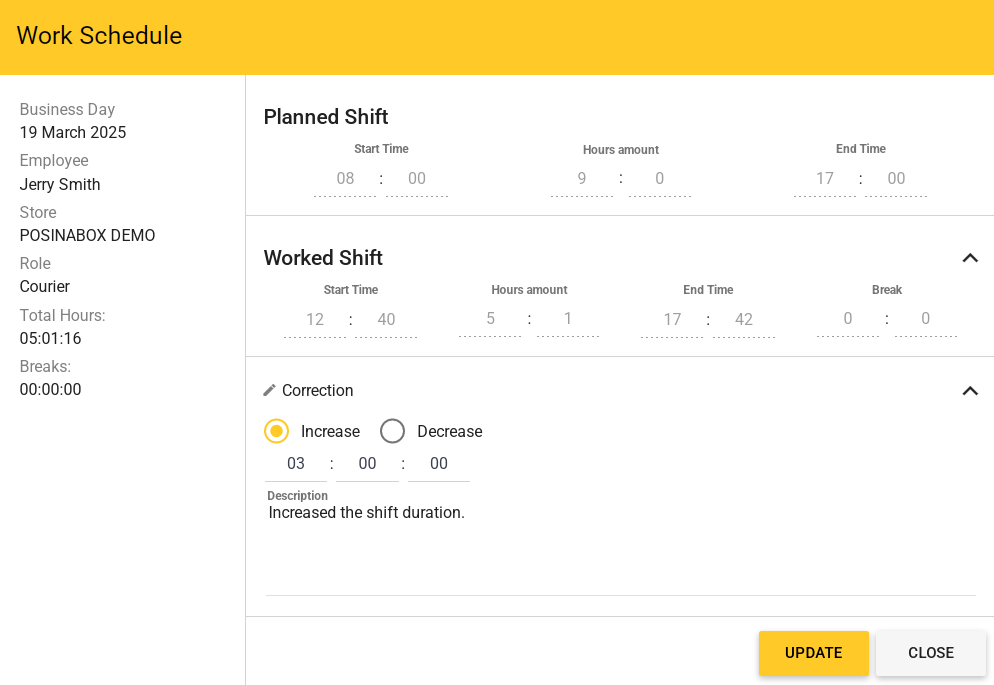
- Expand the Correction node, select the correction type (Increase or Decrease), specify the correction amount (3 h in this example), and then click Update.
Note: An erroneously specified adjustment time can be reset by clicking Reset Correction (in the Work schedule window). After this, you can update the shift again.