This page allows you to manage items for your menus and perform the following operations:
- View and manage current list of menu items.
- Add, delete or duplicate items.
View and Manage the Menu Items List
To view the menu items list
- In the left pane of Back Office Management console, expand the Items List node, and then click Items List:

In this list, each entry has the following fields:
- Name: the item name.
- UPC: the item UPC (Universal Product Code) if specified.
- UOM: a unit of measurements for this item.
- SKU: the item SKU.
- Category: the item category.
- Inventory Recipe Item Type: the menu item type (Menu Item or Retail Item).
- Active: when turned on, the item is active and can be selected for sale.
- Price: the item price.
- Current Cost: the item net cost.
- Markup: displays a difference (in %) between the price and net cost.
- Has Recipes: contains
 if this inventory item has a recipe .
You can manage this list in the following way:
- Click a column name to sort the list by the column name.
- From the Category list, select a category to make Back Office to display only items from that category.
- Select the Cost check box to display the net cost of menu items.
- Click Change Order, and then manually sort the items list by moving selected items up and down.
This defines the order in which the items are displayed in POS Terminal apps. - Click Import to import menu items from an XLSX file.
NOTE: YumaPOS will prompt you to download the XLSX file template. You can both import new items and update existing items. It is possible to perform the export/import operations using the price lists. For more information, see How to Configure the Items Import to Menu.
Delete or Duplicate Menu Items
To delete items
- From the Items list, select item(s) to delete, and click Delete.
- When prompted, confirm the deletion operation.
NOTE: Back Office moves deleted items to Archive. You can restore deleted items in the following way: click the Archive button, select the items to restore, and then click Restore.
To duplicate an item
- From the Items list, select an item, and then click Copy.
This operation clones the selected item.
TIP: Click the cloned item and modify its properties as necessary. You can use the Duplication functionality to add multiple items. For more information, see How to Add Multiple Similar Items.
Add New Menu Item
To add new menu item
- In the Items list, click Add.
This opens the Add menu item form. - Specify the item properties in the General (upper) area of the form:
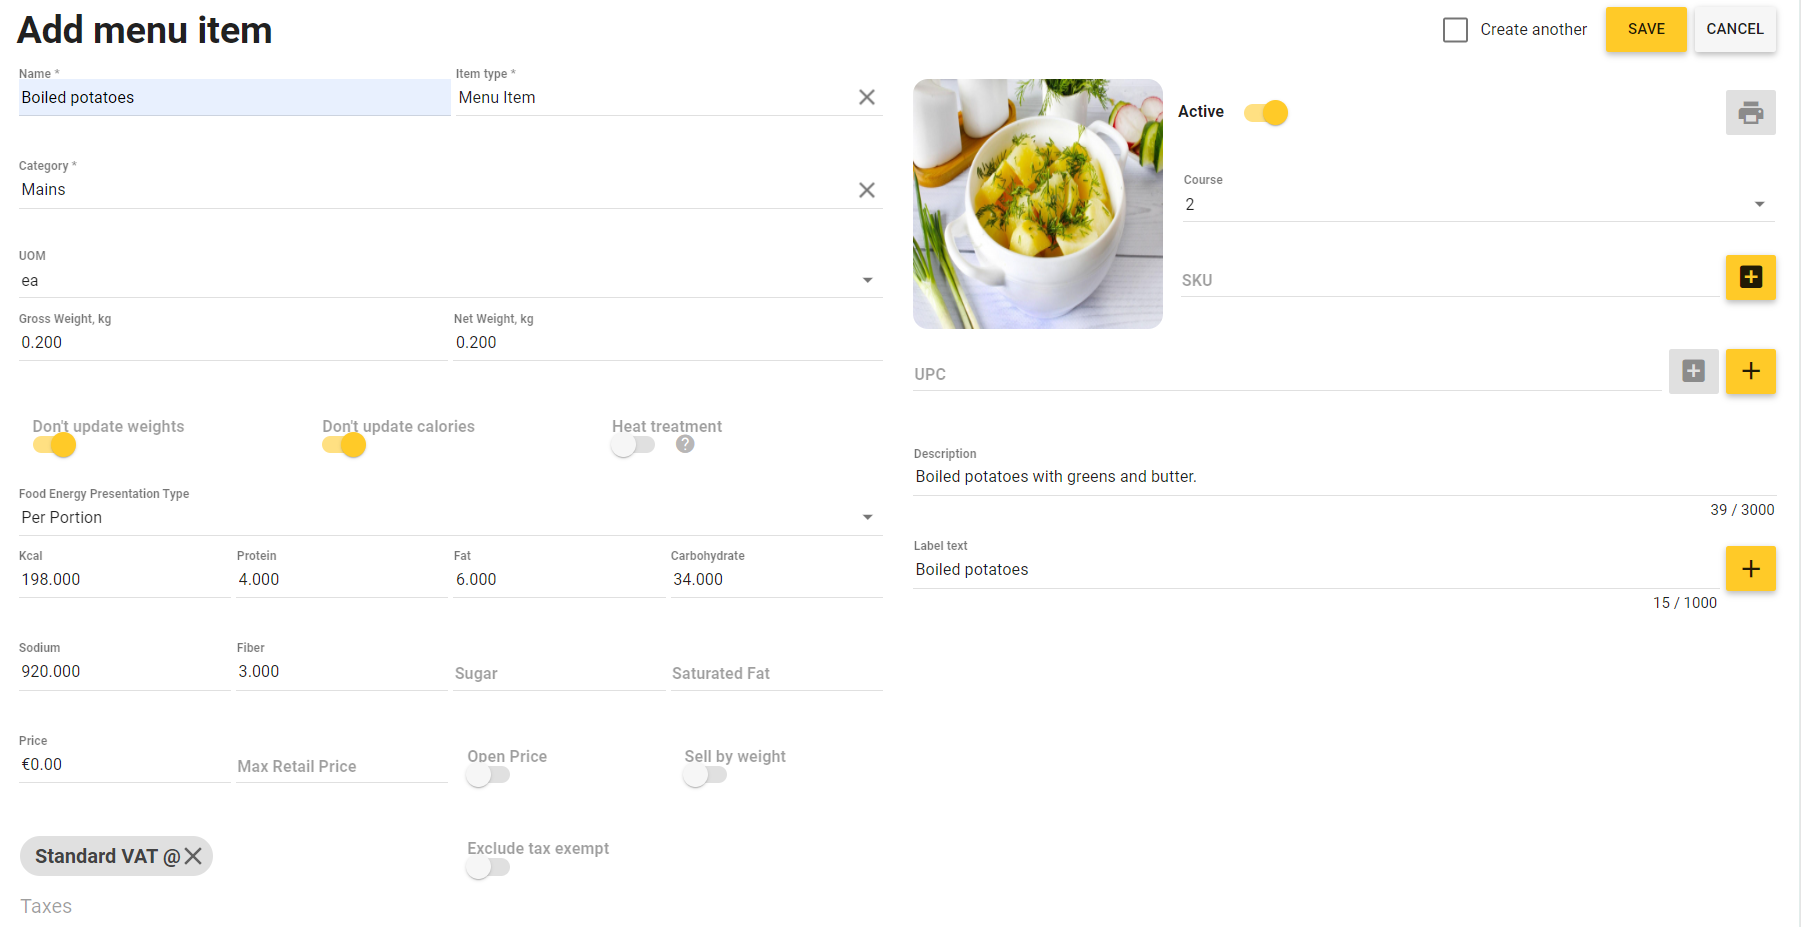
The following properties are available:- Name (mandatory): specifies the item name
- Item Type (mandatory): specifies the menu item type (Menu item or Retail item).
NOTE: For each Retail item, YumaPOS creates an inventory item with the same name. Additionally, for Retail items, in the Inventory category field, you have to specify a category to which the newly created inventory item belongs. The elements of this type have no the Recipe and Related Modifiers tabs. - Category (mandatory): allows you to select a menu category to which this item belongs from the provided list.
IMPORTANT: If you cannot find a suitable category, enter the category name, and click Add. For more information, see Categories List and How to Add New Menu Item. - UOM: from this list, select the unit of measurements for this item (such as kg, ml, etc.)
- Active: when enabled, the menu item is active and can be sold.
- Course: specifies the order of serving dishes.
- UPC: specifies a unique Universal Product Code assigned to each item.
TIP: You can enter UPC or click the plus (+) icon to generate it. For an item, you can set several UPC codes.
IMPORTANT: Before adding a UPC, you should specify an SKU for this item. - SKU: specifies the stock keeping unit number of this item.
TIP: You can enter SKU or click the plus (+) icon to generate it. - Description: specifies an optional description of this item.
NOTE: This description is displayed in Mobile app and the store web site. - Label text: specifies the printed label text.
- Gross weight, kg: specifies a weight of the menu item unit that includes the tare weight (always in kg).
- Net weight, kg: specifies a net weight of the menu item unit (always in kg).
- Don’t update weights: when turned on, YumaPOS uses the Net weight and Gross weight values specified in this form. Otherwise, the values of those parameters are taken from the product recipe.
- Don’t update calories: when turned on, YumaPOS uses the nutrition and energy values of this product specified in this form. Otherwise, the values of those parameters are taken from the product recipe.
- Heat treatment: when turned on, the coefficients of loses that are caused by the product heat treatment are applied. For more information, see How to Set an Energy and Nutrition Values of Foods.
- Food Energy Presentation Type: specifies a weight unit used for food energy calculations. Possible values: Per Portion or Per 100g.
- Kcal (per 100g), Protein (per 100g), Fat (per 100g), and Carbohydrate (per 100g): in these fields, specify appropriate values of those parameters per 100 g of a product or for a product portion.
- Sodium, Fiber, Sugar, and Saturated Fat: in these fields, specify appropriate values of those parameters per 100 g of a product or for a product portion.
- Price: specifies the item price.
- Open Price: specifies whether this item has an open price.
When enabled, the item price can be set in POS Terminal apps while ordering this item.
Important: The menu items with open price are not available in Mobile app and the store web site. - Sell by weignt: enable this setting to sell the item by weight.
- Max retail price: specifies the maximum retail price, if any.
- Taxes: specifies the types of taxes to apply to this item.
TIP: You can select taxes to add from the provided list. - Exclude tax exempt: turn on this button to prevent cashiers from excluding taxes from the item price.
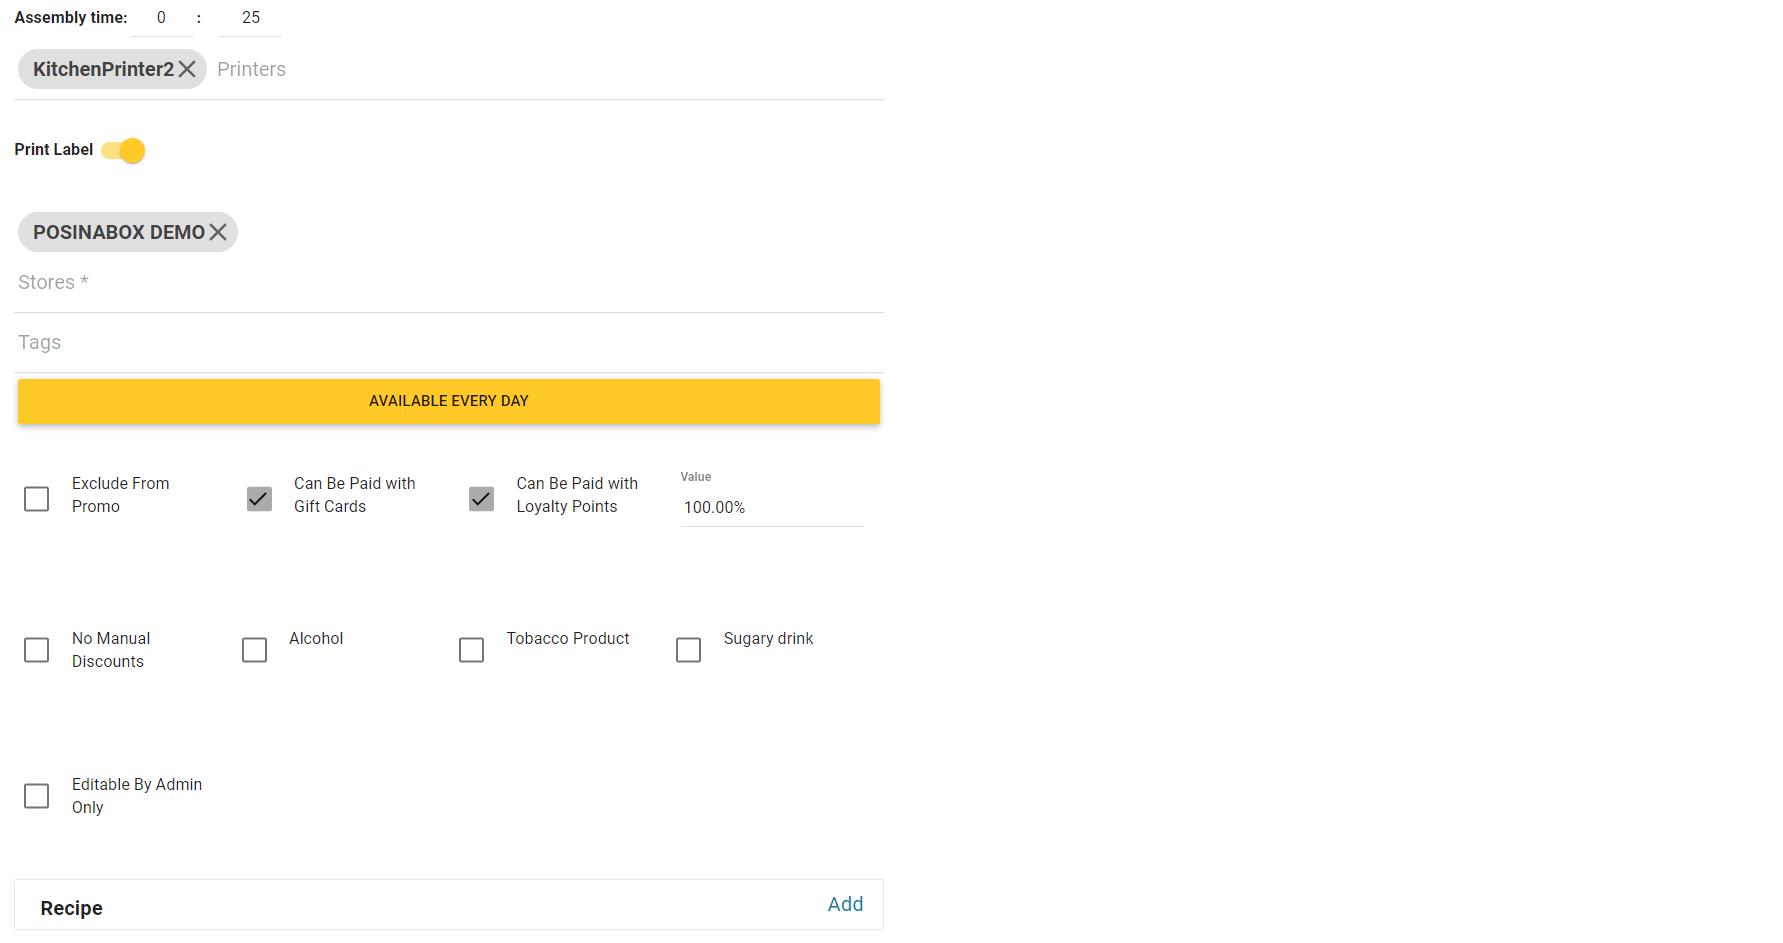
- Assembly time: specifies cooking time for this menu item.
NOTE: this parameter affects the order execution time. For more information, see Time Slots. - Printers: to this list, add kitchen printers used to print out this item in a customer’s order.
NOTE: This parameter is optional. If specified, it overrides the Printer property of the category to which this menu item belongs. For more information, see Kitchen Printers. - Stores: to this field, add stores where this item can be sold. You can select stores from a list of registered stores.
- Available every day: click this bar to specify when this item will be available in the menu.
- Exclude from Promo: select this checkbox to exclude this item from Promo campaigns.
- Can Be Paid with Gift Cards: select this checkbox to allow the customers to use gift cards for buying this item.
- Can Be Paid with Loyalty Points: select this checkbox to allow the customer to pay for this item using their loyalty points. You can also define what percentage of the item value can be paid for in points in the Value text box.
- No Manual Discounts: select this checkbox to deny using manual discounts for this product.
- Alcohol: select this checkbox if this item belongs to the alcohol products.
- Sugary drink: select this checkbox if this item belongs to sugary drinks.
NOTE: This checkbox is used only in Russian Federation. - Tobacco Product: select this checkbox if this item belongs to the tobacco products.
Important: The alcohol and tobacco products are not available in Mobile app and the store web site. - Editable by Admin only: when selected, the item properties can be updated only by employees with Admin role.
NOTE: these restrictions also apply to editing the target items in Promotional campaigns.
- Optionally, if the menu item contains ingredients (inventory items), click Add next to Recipe, specify the item composition (recipe) as shown in the following example, and then click Save:
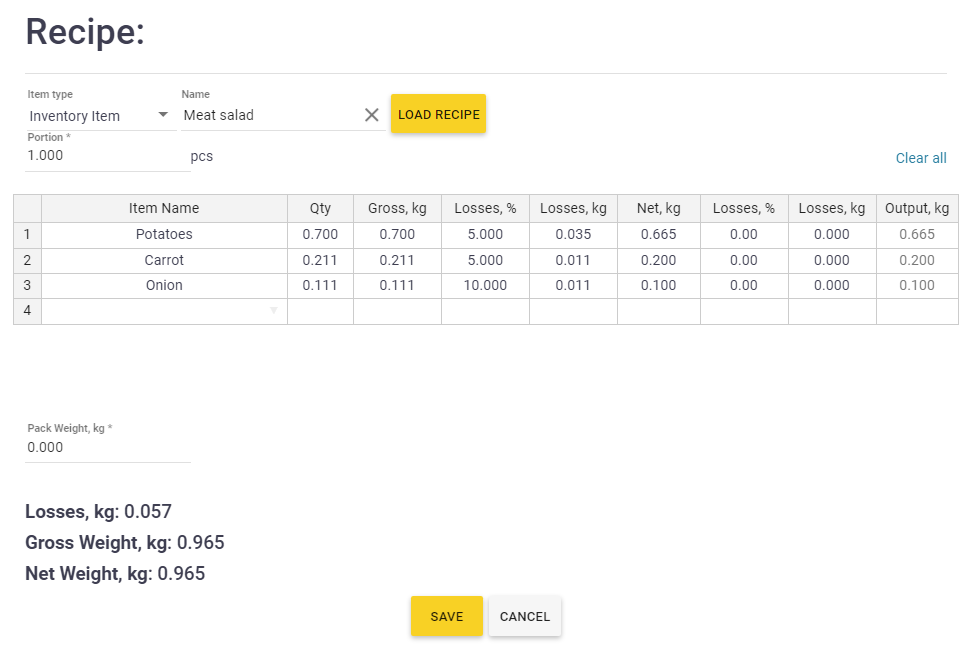
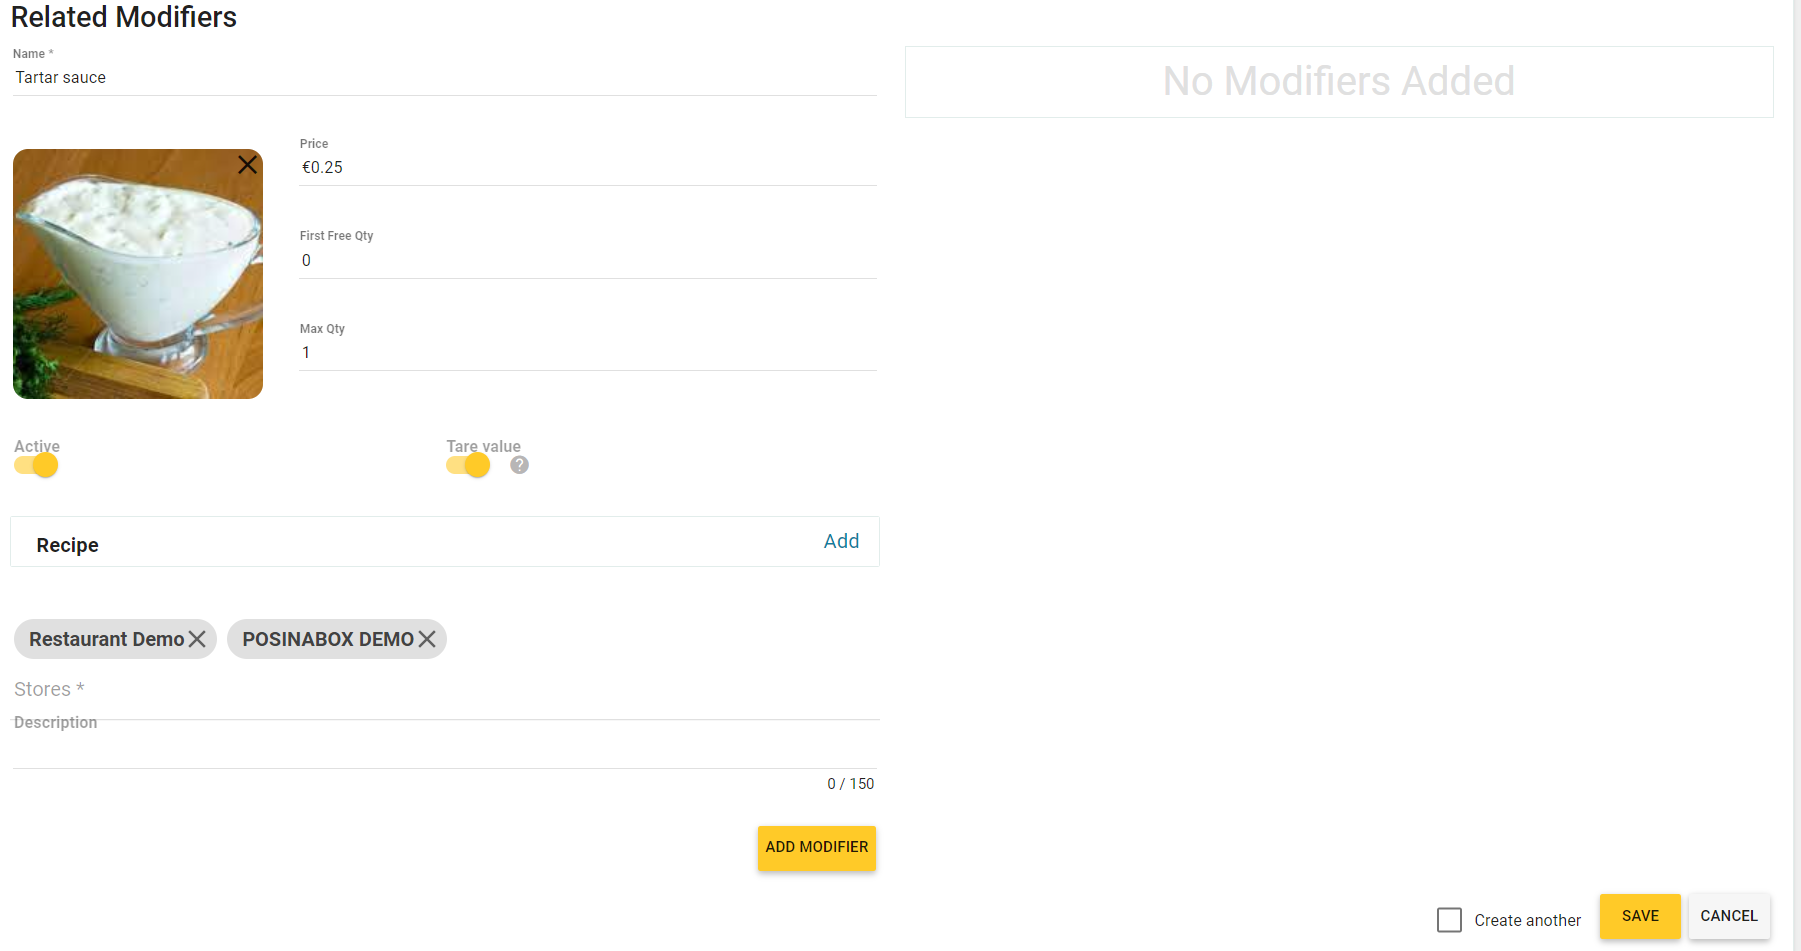
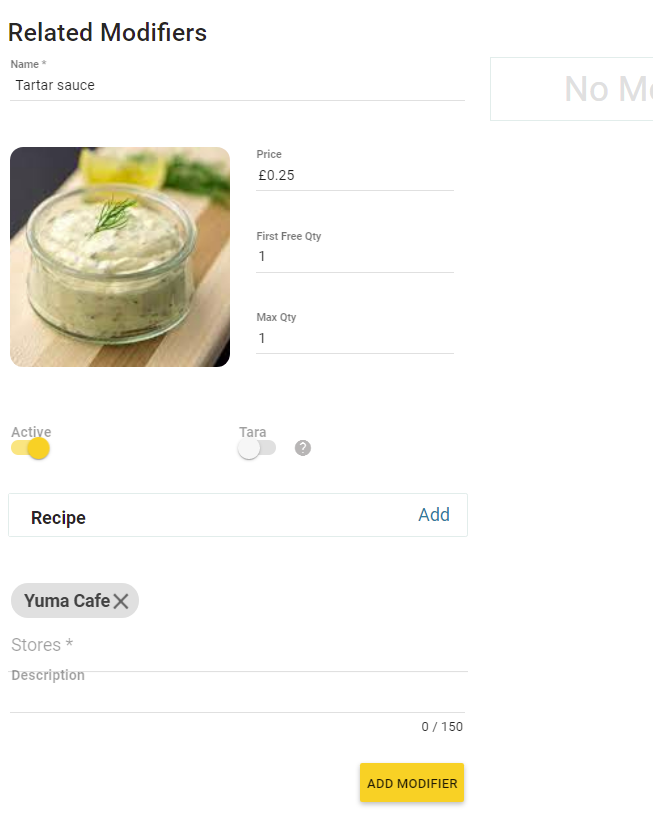
NOTE: For more information, see How to Use Recipes. - If this item should be ordered with modifiers, complete the fields into the Related Modifiers, and click Add Modifier. To clarify, consider an example of this form that allows you to add new modifier (Tartar sauce):
NOTE: For more information about modifiers, see Modifiers.
- When finished, click Save to save your changes.