Overview
The Promotional campaigns feature allows you to offer promotions for specified menu items at a discounted price. You only need to create a detailed scenario of your promotional campaign. The details include the campaign name, description, picture, target audience, target items, etc.
This topic explains how to create your own promotional campaign and manage a list of existing campaigns.
The following subjects are covered:
- View a list of campaigns
- Manage the campaign status
- Delete campaigns
- Change priorities of campaigns
- Add new campaign
View a List of Promotional Campaigns
To view a list of configured promotional campaigns
- In the left pane of Back Office Management console, expand the Marketing node, and then click Promotional Campaigns.
This displays a list of all configured campaigns, if any, similar to the following screen:
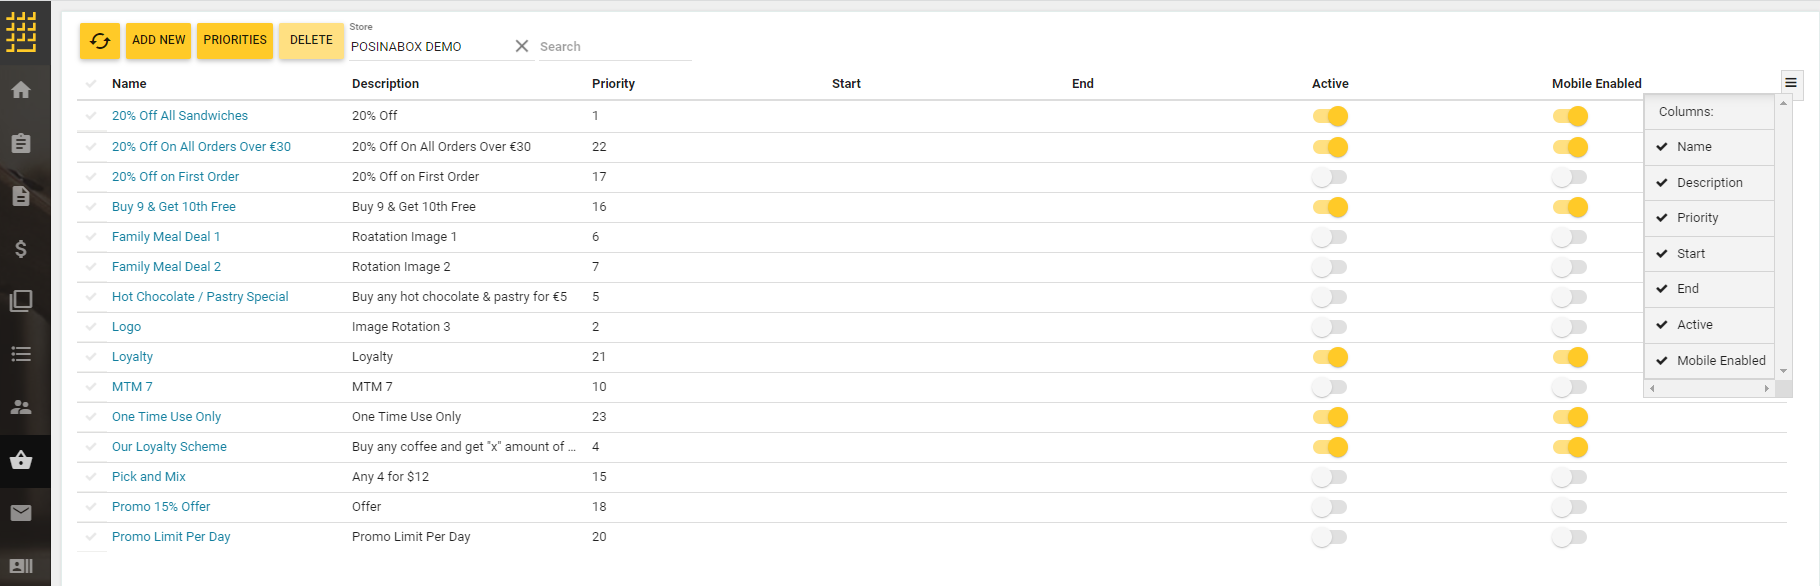
On this page, you can do the following:
- Filter the campaign list by stores that you add to the Store field;
- Customize the list of displayed columns (to do this, click
 and select colums to display);
 - Manage the campaign status using the Active and Mobile Enabled toggle buttons.
- Change priority of campaigns using the Priorities button.
- Deletes promotional campaigns using the Delete button.
- Add new promotional campaigns using the Add button.
- Edit parameters of existing campaigns.
Manage the Campaign Status
To make a promotional campaign active
- Turn on the Active toggle button.
To display the promo campaign logo in Mobile App
- In the list of configured promotional campaigns, turn on the Mobile Enabled toggle button next to a campaign of interest.
- In the settings of a store where the order is placed, enable the Promo on the Mobile Menu setting. For more information, see Register Stores.
IMPORTANT: To ensure that the Mobile App displays a promo campaign logo, enable both above mentioned settings. If the Mobile Enabled setting is disabled, a promo campaign logo is not displayed in the Mobile App menu. However, the promo campaign is available for customers.
Delete Promotional Campaigns
If you want to delete promotional campaigns, complete the following steps:
- From the list of promotional campaigns, select campaign(s) to delete.
- Click Delete.
NOTE: This operation permanently deletes selected promotional campaigns. If you want to suspend a campaign, turn its Active toggle button OFF.
Change Priorities of Promotional Campaigns
Each campaign has a priority (number), for example, 1, 2, 6, etc. The smaller the number, the higher the priority of the campaign.
To change priorities of campaigns
- Click the Priorities button.
This opens the registered campaigns list similar to the following screen:

- Change the order of this list as necessary and click Save.
NOTE: To restore an original list of priorities, click Reset.
Add New Promotional Campaign
Each share is given priority (number), for example, 1, 2, 6, etc. The smaller the number, the higher the priority of the share.
N.B.: If several promotional campaigns affect the selected items, then first the promotion with higher priority applies.
To add new promotional campaign
- Open the list of registered campaigns (see View a List of Promotional Campaigns) and click Add New.
This opens the Add Promotional Campaign form similar to the following screen: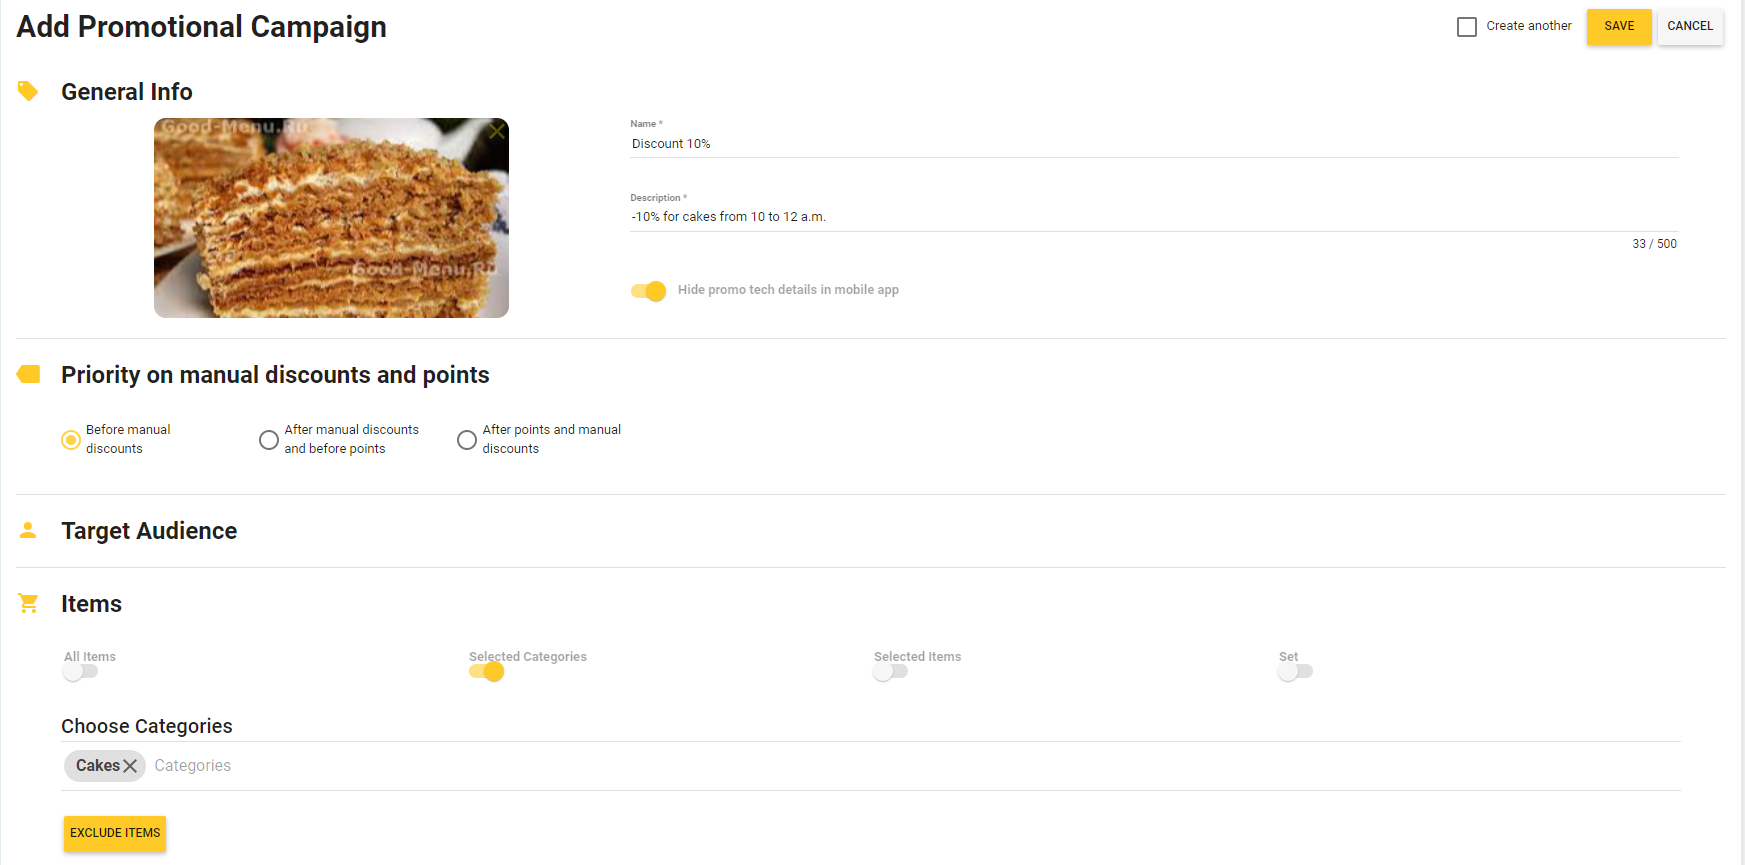
TIP: This form illustrates how to add the following promotional campaign: sell the cakes with a discount of 10% from 10 to 12 a.m. every day from June, 1 to July, 31. For details, see the sections later in this topic.
- In the Add Promotional Campaign form, specify the campaign details, and click Save.
This form includes several sections described later in this topic.
The General Info Section
This section defines the following parameters:
- Name (mandatory): specifies the campaign name
- Description (mandatory): specifies the campaign description.
- Hide promo tech details in mobile app: when turned on, the mobile app and store site display only the name and description of the campaign.
- Optionally, upload the campaign logo.
NOTE: For promotional campaign logo, use graphic images that match the following requirements:
– supported formats (file extensions): .JPG, .JPEG, .JPE, .GIG, .PNG, and .BMP;
– image size (width x height, in pixels): minimum 1600 x 900; maximum 1980 x 1024.
NOTE: The parameters of the General Info section are visible in Mobile apps. Ensure that this information is correct and can attract attention of your customers.
The Priority on Manual Discounts and Points
In this section, you can specify how to apply the promotion campaign. The following options are available:
- Before manual discounts: choose to use the promotion campaign before applying manual discounts and paying with loyalty points.
- After manual discounts and before points: choose to use the promotion campaign after applying manual discounts, but before paying with loyalty points.
- After points and manual discounts: choose to use the promotion campaign after applying manual discounts and paying with loyalty points.
The Target Audience Section
In this section, you can specify the target audience of your campaign. You can make this promotional campaign available for all your customers, for all your registered customers or only for specified groups of customers.
This section defines the following elements:
- All Registered Customers: when ON, your promotional campaign is available for all registered customers
- All Customers: when ON, your promotional campaign is available for all customers
- Excluded Customer Groups: click this element to specify groups of customers for which this campaign is not available.
- Stores: click this element to specify the stores where this campaign is active.
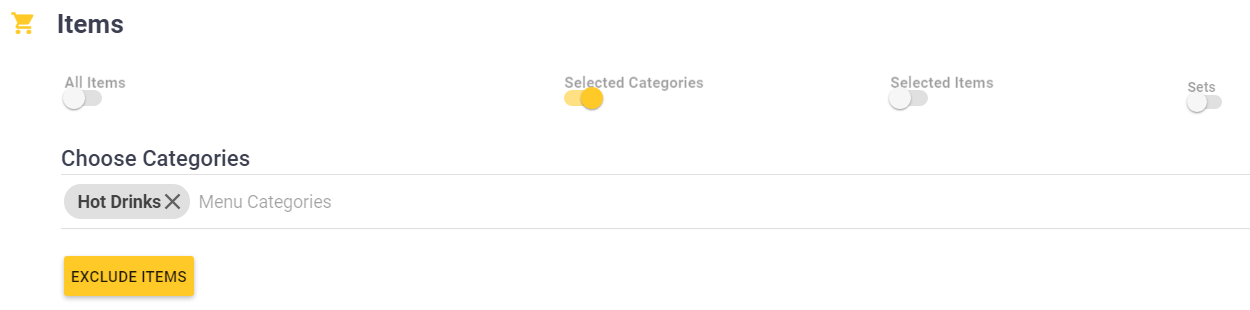
The Items Section
In this section, you can specify target items, item categories, or sets to which this campaign applies.
This section defines the following elements:
- All Items: when ON, the campaign applies to all your menu items
- Selected Categories: when ON, allows you to specify the menu categories to which the campaign applies. Click Choose Categories and select the menu categories from the provided list. Optionally, you can exclude some items from this campaign. To do so, click Exclude Items, and select items to exclude:
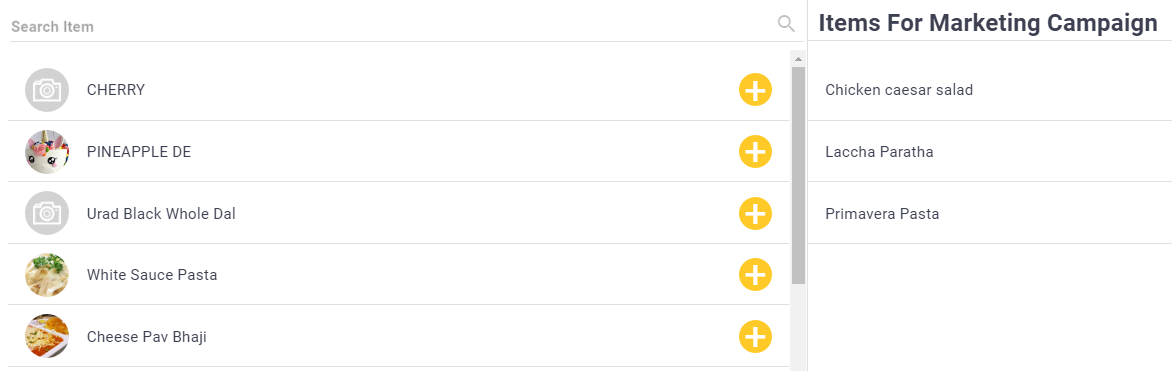
- Selected Items: when ON, allows you to specify the menu items to which the campaign applies.
Click Add Items, and use and
and  icons to add/delete the desired menu items under Items For Marketing Campaign:
- Set: when ON, allows you to compose a set to which the campaign applies. The set can include a list of specific menu items or menu categories.
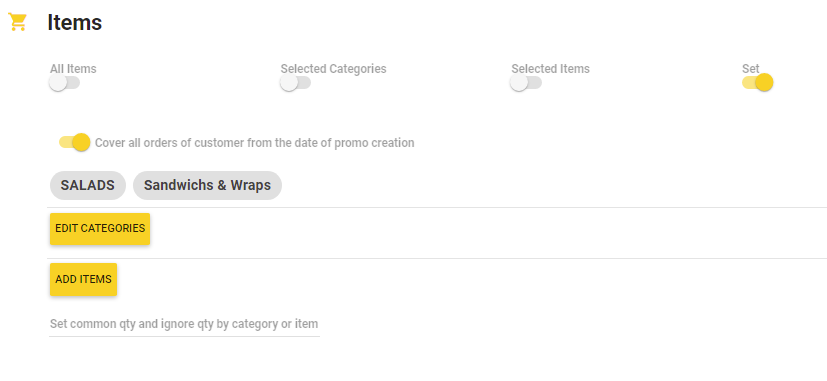
- To add menu items, click Add Items, and use and icons to add/delete the desired menu items to the set:
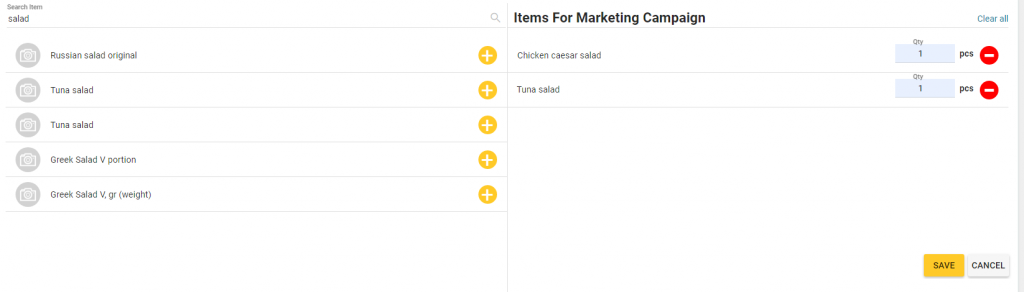
TIP: In the Qty column, specify the number of items for each component of your set.
In this example, the set includes a portion of Chicken caesar salad and a portion of Tuna salad. - To add menu categories, click Add Categories, and use and icons to add/delete the desired categories to the set:

In this example, the set includes two any salads.
For sets of items, there are two additional settings:
- Cover all orders of customer from the date of promo creation: when enabled, a customer can make several orders to buy all promo items that belong to a set. Otherwise, they must make only one order.
Important: This option is available only for registered customers. In the Target Audience section, please select the Registered Customers option. - Set common qty and ignore qty by category or item: in this field, you may enter a total number of the set items the customer can buy when the promo campaign is available. To clarify, consider the following scenario: a promo set includes a salad and a sandwich, and you set this parameter to 2 (two). In this case, a customer can buy two salads or two sandwiches; or a salad and a sandwich.
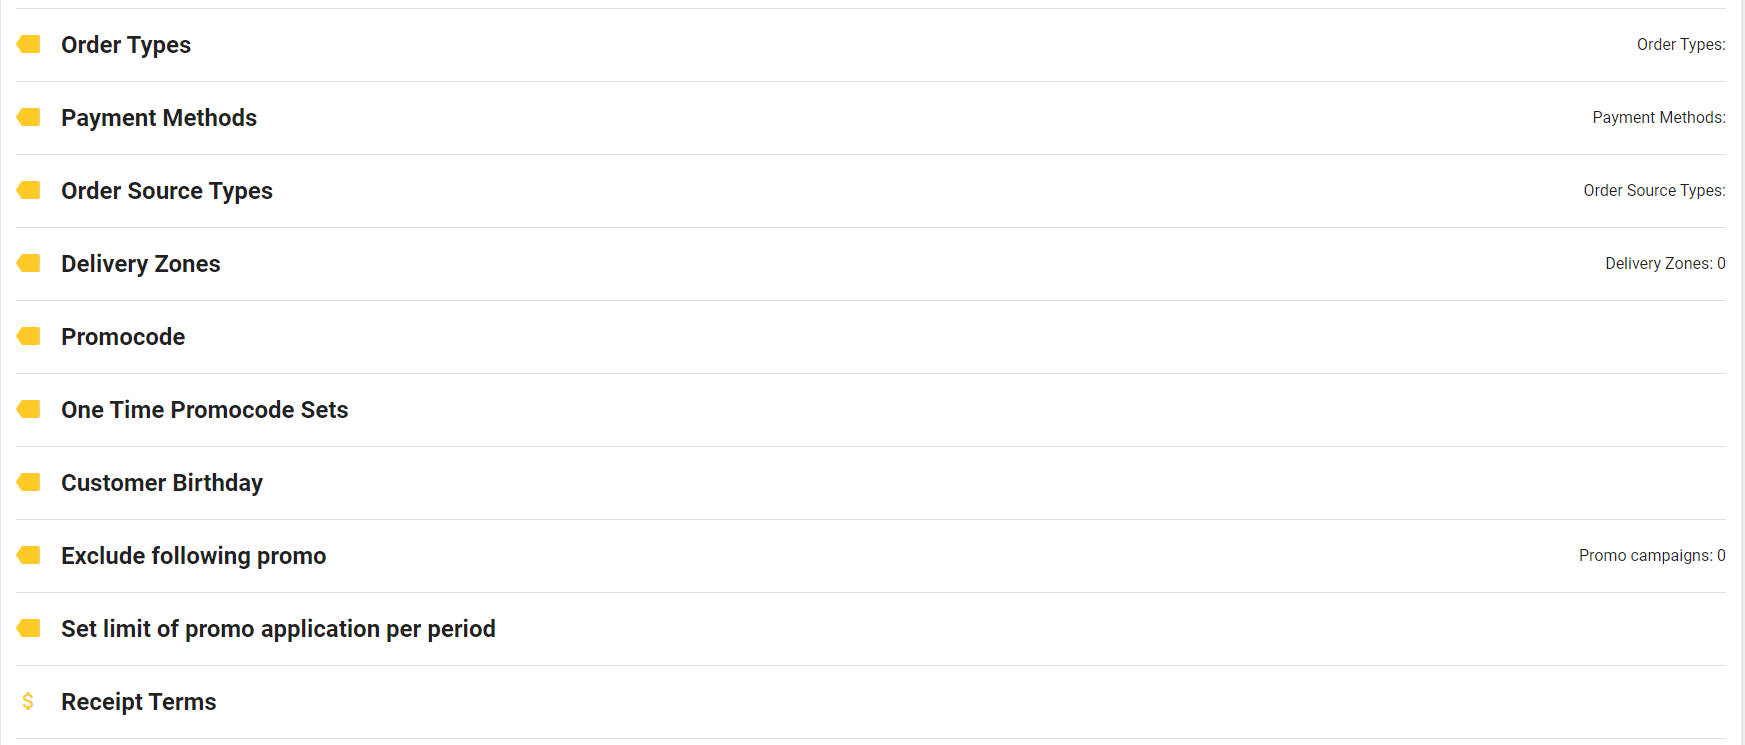
The Order Types Section
In this section, you can specify order types, which can participate in this campaign.
The following order types are available:
- Take out
- Dine in
- Quick
- Delivery
NOTE: To apply this campaign to all types of orders, leave this section empty.
- Cover all orders of customer from the date of promo creation: when enabled, a customer can make several orders to buy all promo items that belong to a set. Otherwise, they must make only one order.
- To add menu items, click Add Items, and use
The Payment Methods section
In this section, you can specify the order payment methods that can be used in this promo campaign.
Click the Payment Methods line, and then select the payment methods (such as Cash, Debit card, etc.) from the provided list.
TIP: You can specify the available payment methods in Settings > Payment Types.
The Order Source Types Section
In this section, you can specify which orders can participate in this promo campaign. For example, you can create a promo campaign only for orders created using the Mobile app or the store Web site.
The following order sources are supported (the list is not complete):
- Terminal
- Mobile app
- Web shop
- Kiosk
- Uber Eats
NOTE: To apply this campaign to all types of the order sources, leave this section empty.
The Delivery Zones Section
In this section you can specify delivery zones that participate in this promo campaign. In this case, the promo campaign does not cover the delivery orders with other delivery zones. You can set delivery zones in the store settings.
NOTE: To apply the promo campaign to all delivery zones, leave this section empty.
The Promocode Section
In this section, you can specify a unique promocode that your customers can use in Mobile app or the store Web site, or communicate the promocode to a cashier. You can also specify how often a customer can use this promocode as shown in the following screenshot:
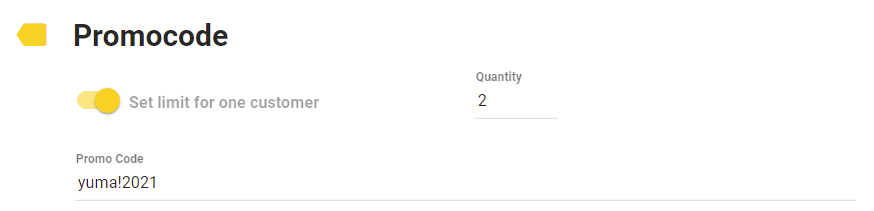
You can send the promocode to your customers using an SMS service or push-messages.
The One Time Promocode Sets Section
In this section, you can select the one time promotional code sets created on the Marketing > Promotional Codes page of Back Office. You can save the created sets to Excel tables, and then send them to your customers. For more information, see One Time Promotional Codes.
The Customer Birthday Section
In this section, you can create a promo campaign that is active on a customer birthday. Optionally, you can make this campaign active before or after the customer birthday. To clarify, consider the following screen:

NOTE: If you have not specified the Days before and Days after values, the promo campaign is active only on the customer birthday.
The Exclude Following Promo Section
In this section, you can specify a list of the promo campaigns that will not apply to the order after applying this campaign.
NOTE: If an order is under action of several promo campaigns, they apply in the order of their priorities. That is why, the list of the promotional campaigns can include only campaigns with lower priorities.
The Set Limit of Promo Application per Period Section
In this section, you can specify restrictions applied to the promo campaign as shown in the following screenshot:

Specify the following values:
- Period of days: sets the promo campaign duration (in days).
- Max quantity per period: sets a total number of the promo campaigns that can be used by all customers.
The above screen illustrates how to create a campaign that is active 10 days. The campaign can be used only 20 times (for all customers). After this, the promo campaign becomes inactive.
However, if you enable the Calculate count by customer setting, the promo campaign restrictions will apply to a single customer. For example, consider the following sample scenario:

In this scenario, the following restrictions are applied: the campaign duration is 10 days, and each customer can take part in it only once.
IMPORTANT: After expiring the period (in this example – 10 days) the promotion campaign starts again.
The Receipts Terms Section
In this section, you can specify a minimum and maximum amount of receipts that participate in the promotional campaign. Additionally, you can specify rules used to calculate the order amount.

This section defines the following elements:
- Min. cost: specifies the minimum receipts amount (in the currency units).
- Max cost: specifies the maximum receipts amount (in the currency units).
- Apply to intermediate price: when turned on, the promotional campaign applies to a final price of the order. The final price takes into account all applied discounts if any.
- Excluding the use of points: when turned on, the receipt amount does not include a part of the order price paid with loyalty points.
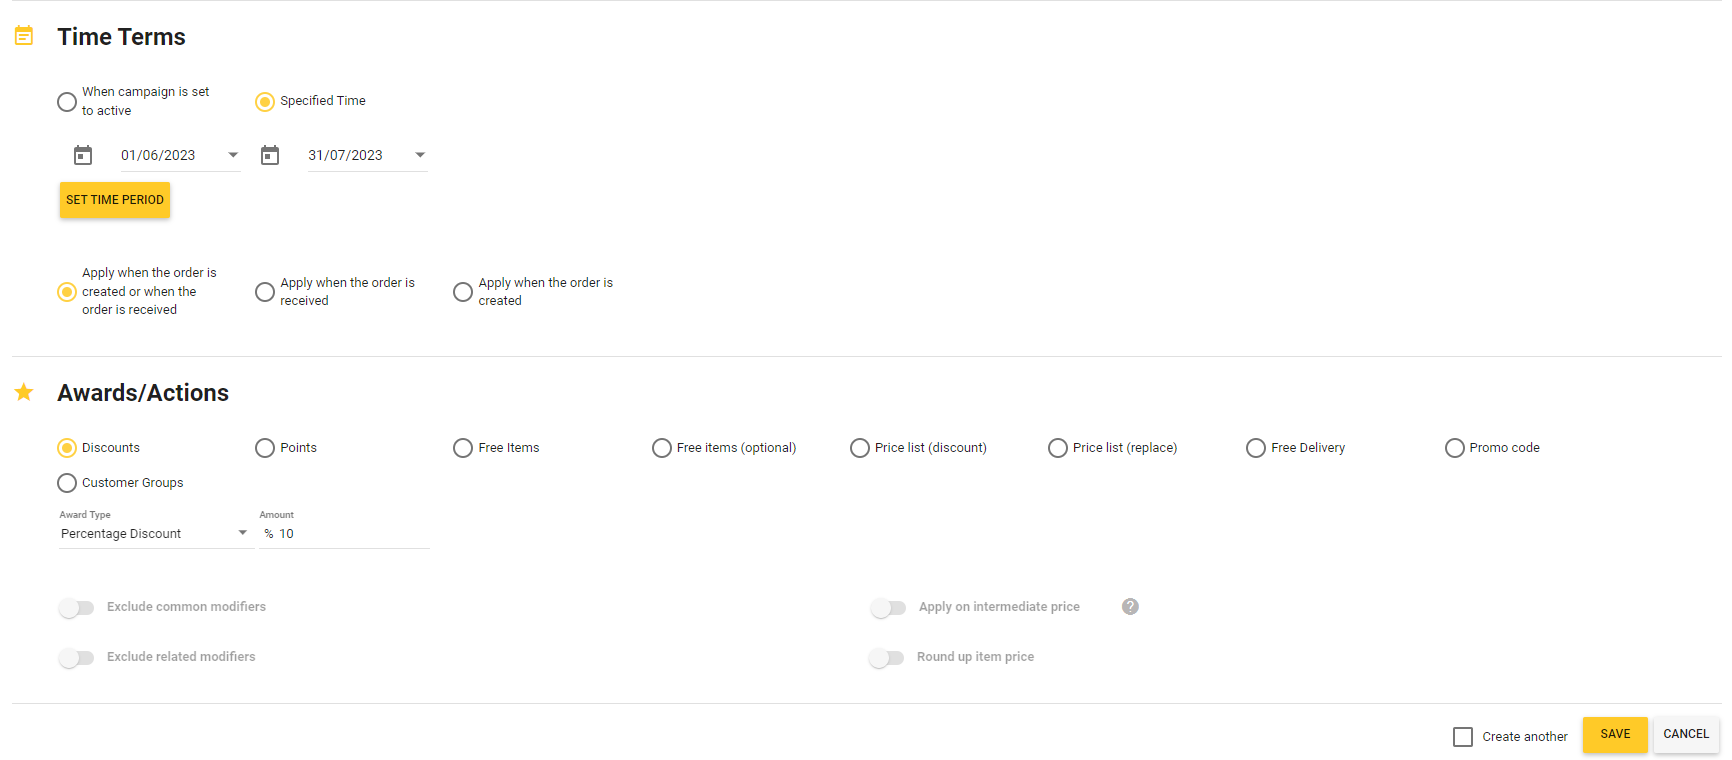
The Time Terms Section
In this section, you can specify when your promotional campaign is active. For example, you can make your campaign active on certain days of week, at specific hours, or for specified period.
This section defines the following elements:
- When campaign is set to active: select this option to specify days of week when this campaign is active
- Specified Time: select this option to specify days of week and the time period for which this campaign is active.
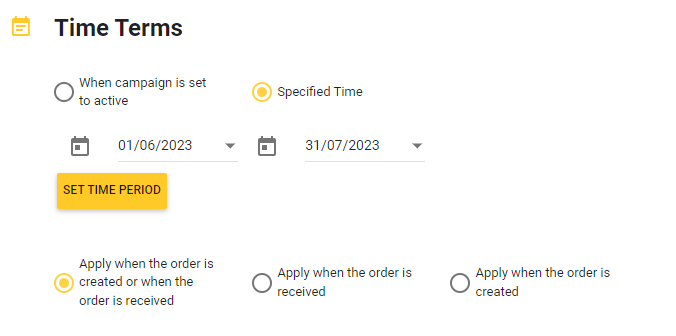
To specify the hours and days of week when this campaign is active, click Set Time Period, and complete the Time Period form that opens:
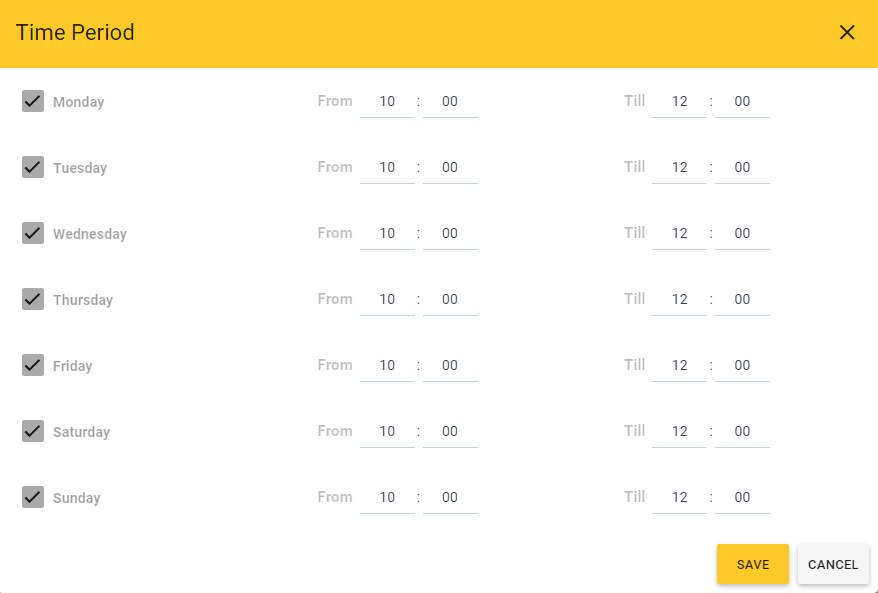
This form illustrates how to make the promotional campaign active every day from 10 to 12 a.m. within the following period: from June, 1 to July, 31 (2023).
- Apply when the order is created or when the order is received: When selected, the promotional campaign is active according to the Specified Times settings (see earlier in this section).
NOTE: This option is selected by default. - Apply when the order is received*: When selected, the order receiving time is used to verify whether the promotional campaign applies to this order.
- Apply when the order is created*: When selected, the order creation time is used to verify whether the promotional campaign applies to this order.
*NOTE: These options apply only to delivery orders. To clarify, consider the following sample scenario: you have selected the Apply when the order is created option for a promotional campaign, which is active from 20 to 22 h. A customer made a delivery order at 19 h, but you delivered that order at 21 h. For this customer, the promotional campaign is not active, because the customer made their order before 20 h.
The Awards/Actions Section
This section allows you to specify the details of the campaign awards. For example, you can create simple discounts such as 15% off an order or more complex discounts like buy one item and get other items free.
This section defines the following elements:
- Discounts: select this option to create a simple discount:

You can specify Percent Discount (in %) or Cash Discount (in units of currency) - Points: when selected, your customers and employees will get points for order of the target items (see The Items Section earlier in this topic):
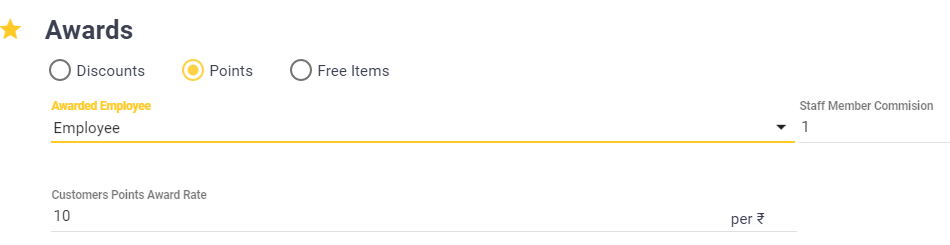
Under Awards, use the following elements to specify this discount:
- Staff Member Commission: specifies the number of points (per each unit of currency) for employee who processed the customer order.
- Customer Points Award Rate: specifies the number of points (per each unit of currency) for customer who paid this order.
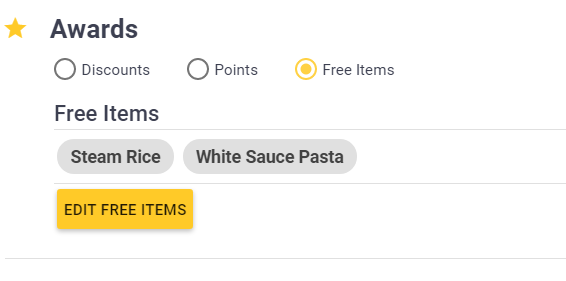
- Free Items: when selected, allows you to create a complex discount like “buy a target item, get some other items free”:
- Free items (optional): when selected, allows you to create a complex discount like “buy a target item, get a specified number of free items from selected categories.” For example, you can create the following promotional campaign: when customers buy a set, which includes two salads, they can get any free hot drink. For more information, see Customer Loyalty Programs.
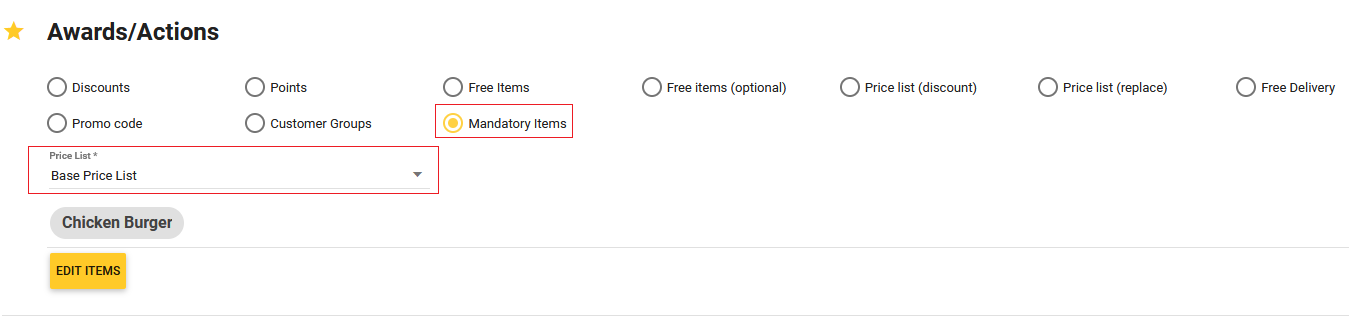
- Mandatory items: when selected, allows you to add selected menu items to the customer award and specify the used price list:
- Price list (replace): when selected, the target items will be sold using the prices from the selected price list:

NOTE: This option is not available if you selected the Set option in the Items section.
In the given example, the sell prices of the target items are indicated in the “Base Price List” price list. For more information on how to use the price lists see Price Lists - Price list (discount): this is an alternative to the Price list (replace) option. When applying this award, the customer sees a crossed out base price and the discount price.

- Promo code: when selected, the customer award is a promocode:

Important: Before using this feature, it is necessary to create at least one set of promotional codes.
Use the following switch buttons to specify how to deliver promotional codes set:- Print on receipts: the promo code sets are printed on the receipt that confirms the order payment.
- Send to Customer App: the promo code sets are sent using the push-messages.
- Customer Groups: when selected, YumaPOS adds or removes customers from selected static groups of customers. This action can be considered as an award.

For example, you can organize the following campaign: «If the receipt amount exceeds 500 (in the currency units), the customer is added to the “Test group” group and excluded from the group «New Customers.» - Set price: this option is available only if you selected the Set option in Items. You can specify the set price in the Specified Price field. This price does not depend on prices of each item from the set.

See also
- Discounts
 watch our help video about Promotional Campaigns:
>