This page describes your personal system settings such as, the taxation type, a maximum receipt limit, and some other advanced settings.
To open the System Settings page
- In the left pane of your Back Office Management console, click Settings and then click System Settings:
This page defines the following elements:
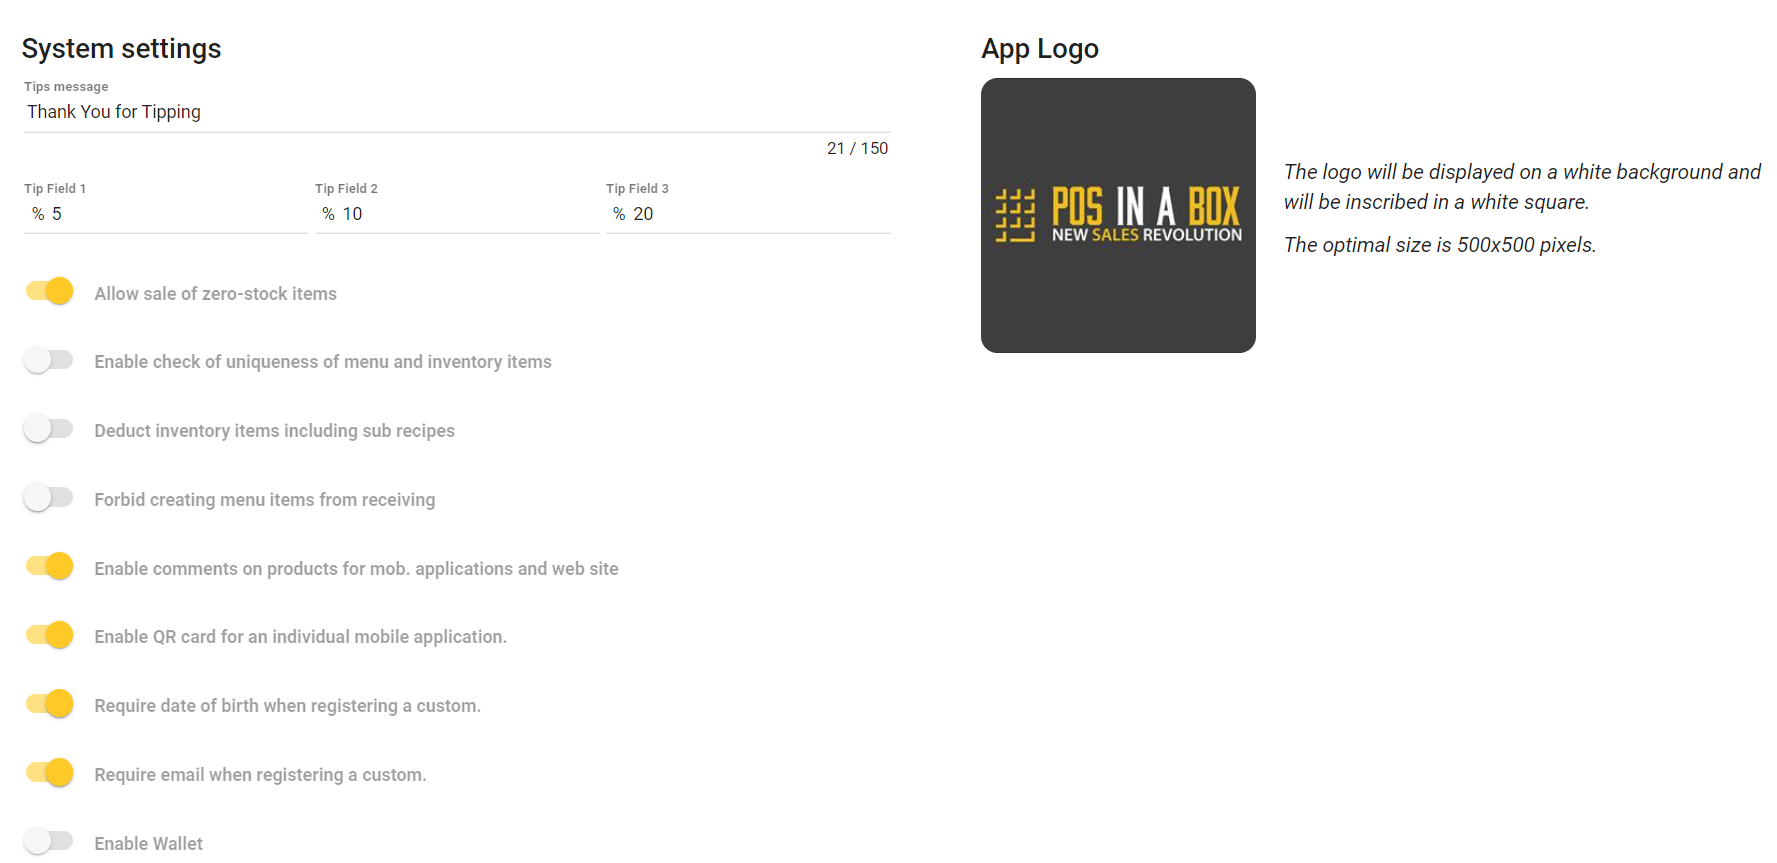
- Apps Logo: lets you upload a logo for the web site of your store. The optimal size of the logo is 500 x 500 pixels.
- Tips message: specifies an informal tips message to display for Mobile application users when they make an order.
- Tip Field 1, Tip Filed 2, and Tip Field 3: specify tips calculated as a percentage of customer total bill. Example of Mobile application screen that prompts a customer to select the tips amount:

- Allow sale of zero-stock items: specifies your zero stock policy: when this toggle button is set to Off, YumaPOS system does not confirm orders that include zero stock items.
- Enable check of uniqueness of menu and inventory items: when enabled, you cannot add inventory items with the same names.
- Deduct inventory items including sub recipes: if enabled, when you sell dishes with nested recipes, YumaPOS writes-off only inventory items specified in the first recipe of the recipe hierarchy. For more information, see “Scheme for Writing-off Inventory Items for Dishes with Nested Recipes” in How to Use Recipes.
- Forbid creating menu items from receiving: when enabled, you cannot add new menu items using Acts of receiving.
- Enable comments on products for mob. applications and web site: when enabled, the customers that make their orders using Mobile app or the store site can add their comments to each order item.
- Enable QR card for an individual mobile application: when enabled, Mobile app contains a QR code that can be scanned when a customer makes their order through POS terminal.
- Require date of birth when registering a custom.: when enabled, YumaPOS system prompts customers to enter their birthday when they sign in to Mobile app.
- Require email when registering a custom: when enabled, the email field becomes mandatory for registering new customers using Mobile app.
- Enable Wallet: when enabled, Mobile app does not work as an online shop. Only the customer data sheet and Wallet are available.
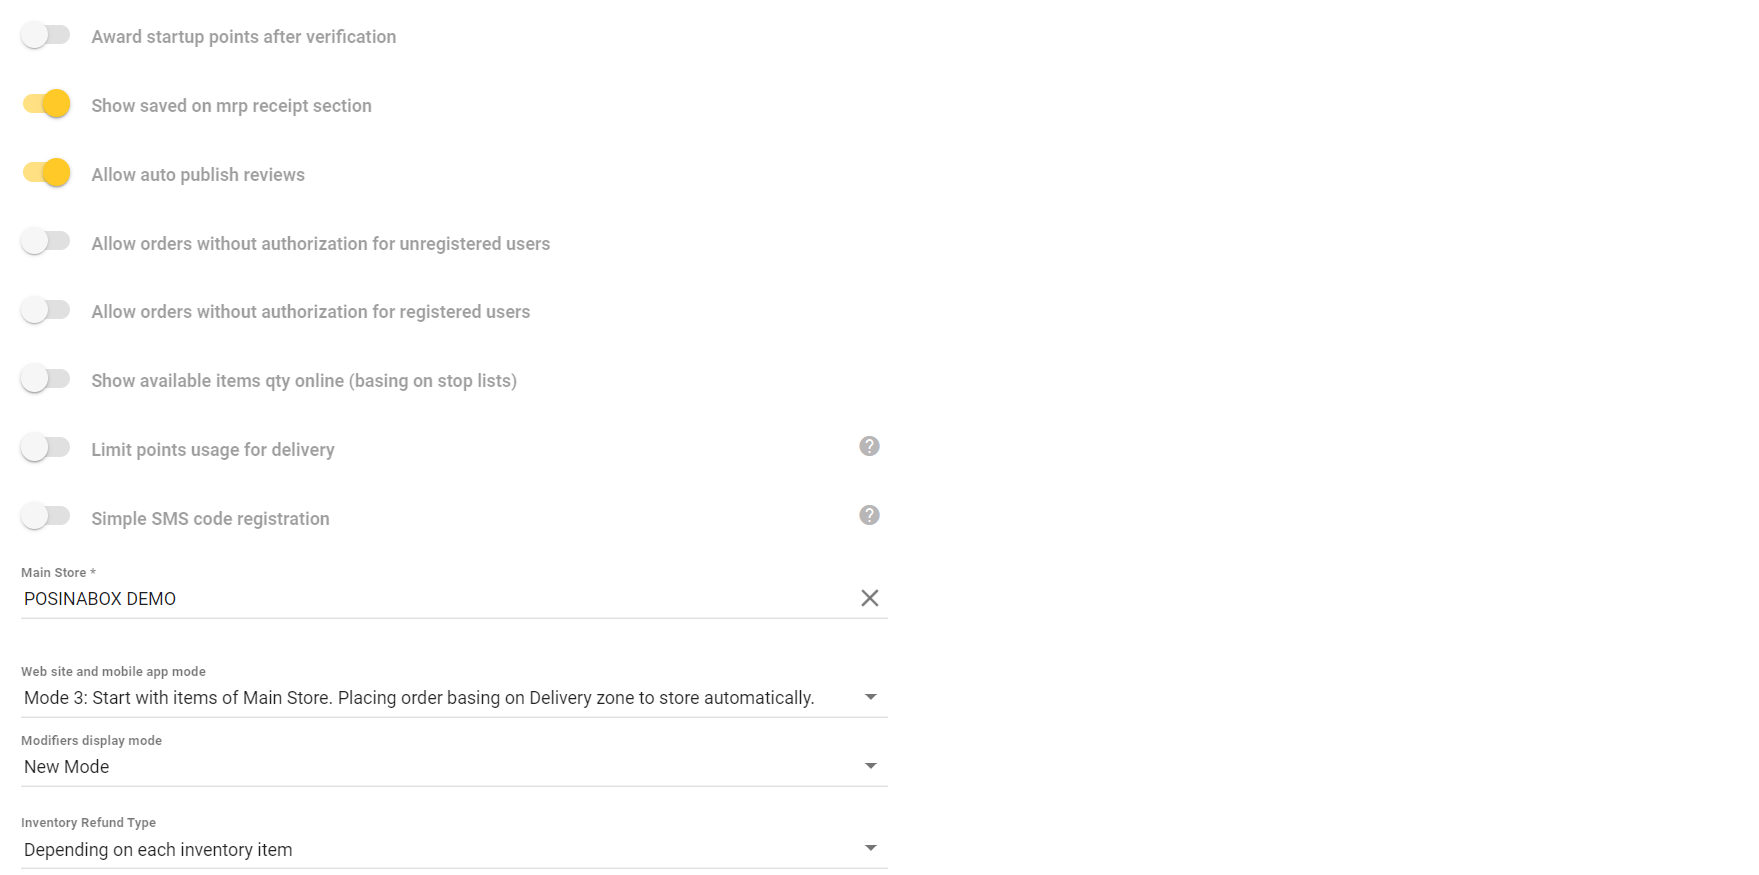
- Award startup points after verification: enable this setting to award the welcome loyalty points to new customers after their registration. The amount of the welcome loyalty points is specified in the Startup points setting.
- Show saved at mrp receipt section: when enabled, the maximum retail price (MRP) of the menu items (if any) are printed on the customer receipts.
- Allow auto publish reviews: when enabled, the customer reviews are automatically published in Mobile app and at the store web site.
- Allow orders without authorization for unregistered users: enable this setting to let unregistered customers make their orders at the store site without authentication. In this scenario, to pass the registration procedure, the customer must provide only their name and the cell phone number (without any confirmation).
NOTE: To use this option, the customer should click Skip registration in the login form. - Allow orders without authorization for registered users: enable this setting to let registered customers make their orders at the store site using their cell phone number. In this scenario the authentication is not required.
NOTE: To use this option, the customer should click Skip registration in the login form.
IMPORTANT: Two above mentioned settings do not affect Mobile app. Those settings must be enabled simultaneously, or you can enable only the first setting (for unregistered customers). Enabling only the second setting (for registered customers) does not affect the store site. - Show available items qty online (basing on stop lists): when enabled, the menus of the store web site and Mobile app display whether a menu item is added to stop list or automatic stop list. The items from the stop list have the “STOP” labels. The items from the automatic stop list have the “Available <available qty>” labels, such as “Available 4 pcs”, where 4 is available amount of item.
If this setting is disabled, menu items from the stop list are not displayed in the menu and cannot be added to the cart. - Limit points usage for delivery: when enabled, the customers that pay their delivery orders with loyalty points cannot decrease the order price lower than a minimum delivery order price or a minimum price for free delivery.
- Simple SMS code registration: when enabled, the customers should not set their password. In this scenario, they can enter the store web site or Mobile app using an SMS code.
The registered customers can use both their password and an SMS code. If a registered customer forgot their password, it is not necessary to restore the password. - Main Store: specifies the Main store. In this case, the customers using Mobile app can make their orders only in the Main store. The Main store depends on the Web site and mobile application mode setting.
- Web site and mobile application mode: specifies the order processing mode:
- Mode 1: Start from list of stores. Open store. Place order in this store.: This mode does not require you set the Main store. Mobile apps or the store web site prompts a customer to select a store from the provided list. When the store is selected, the customer can place their order in that store.
- Mode 2: Start with items of Main Store. Placing order only into Main Store (call center).: This mode requires you set the Main store. A customer can place their orders only in the Main store.
- Mode 3: Start with items of Main Store. Placing order basing on Delivery zone to store automatically.: This mode requires you set the Main store.
How it works?
After logging in to Mobile apps or the store web site, a customer sees the Main store menu.
If the customer makes a takeout order, they can select a store from which to take the order from the store list.
If the customer makes a delivery order, YumaPOS automatically assigns a store from the customer address delivery zone.Note: The Main store menu must be in sync with menus of all other stores!
Important: To use the modes 2 and 3, you should specify the Region setting for all your stores. Furthermore, in Mode 3, if your stores are situated in several regions, a customer should first select their region, and only then they are presented with a menu available in that region.
Tip: You can specify a store region in the store settings. For more information, see Advanced Parameters of Stores.
- Inventory Refund Type: for refunding orders, specifies whether to return the inventory items that are components of the order items recipes. The following return modes are supported:
- Depending on each inventory item: for each inventory item, the return mode depends on the state of its Returnable setting (for more information on the inventory items properties, see Managing Inventory Items and How to Modify an Inventory Item).
- Always*: after refunding an order, the inventory items are always returned to a warehouse.
- Never*: after refunding an order, the inventory items are never returned to a warehouse.
*NOTE: Independently of the Returnable setting for each inventory item.
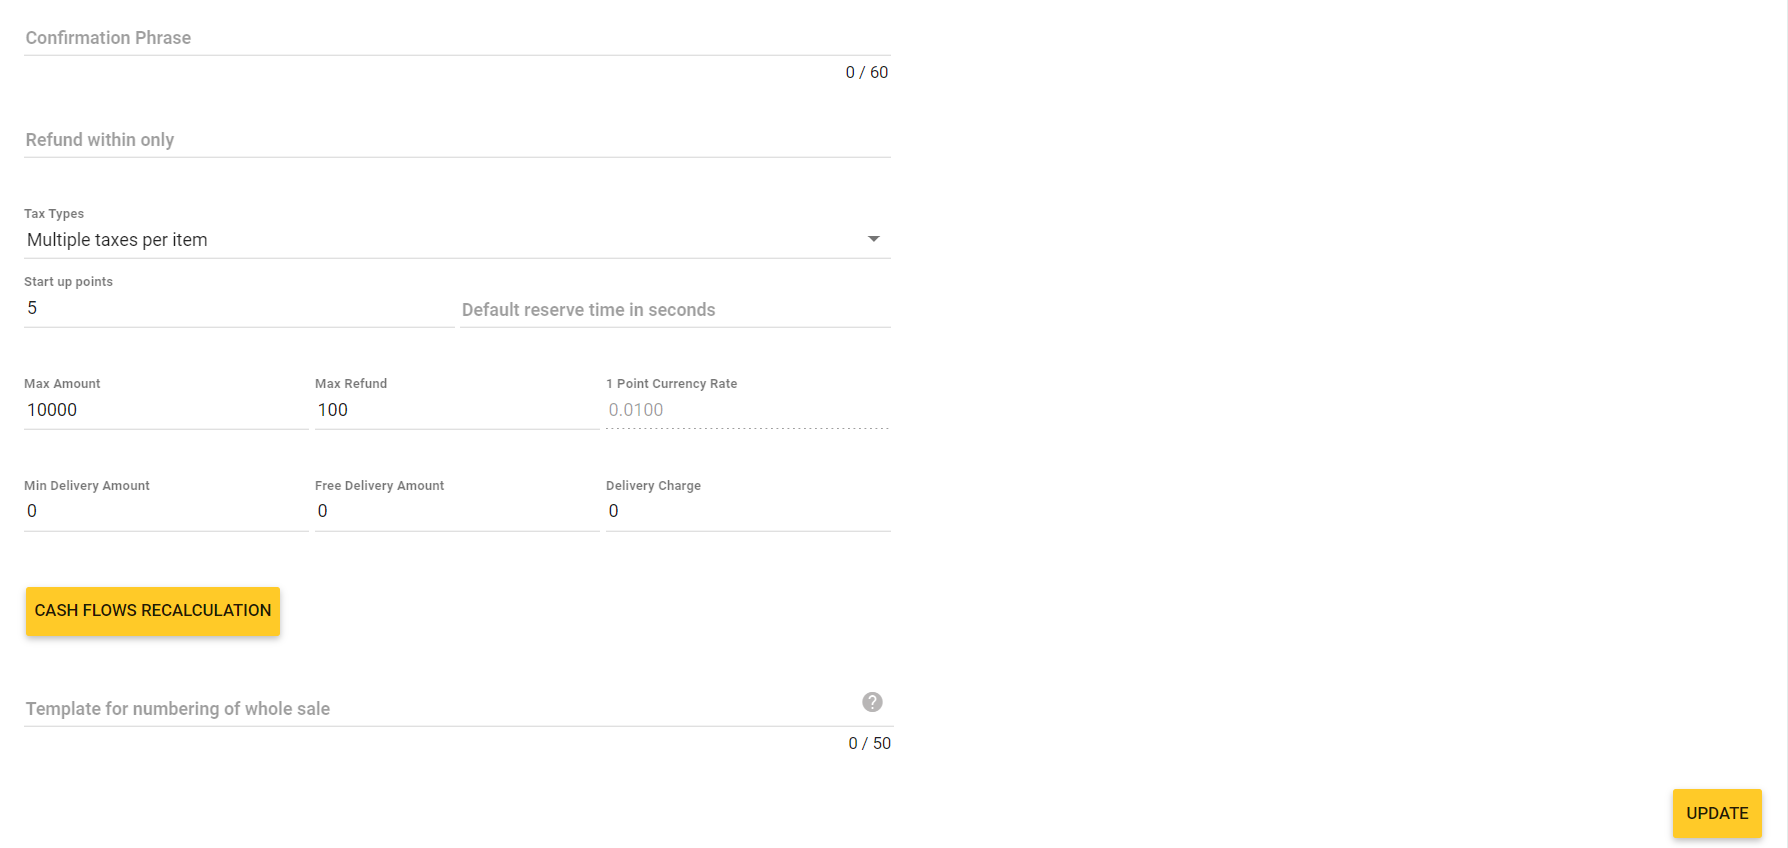
- Confirmation phrase: specifies a phrase to send to the Mobile app or web site customers after the order confirmation, for example: “Your order is confirmed. Thank you!”
- Refund within only: specifies the refund period (in days).
- Tax Types: specifies the tax rate type to apply to sales. Depending on your country or region, you should apply the multi-rate sales tax or single-rate sales tax per item.
- Start up points: specifies the number of the welcome loyalty points for newly registered customers. For more information, see “Point Program” in Customer Loyalty Programs.
- Default reserve time in seconds: specifies a default time for tables reservation. For example, if you set this parameter to 3600, the table reservation time is 1 hour.
- Max Amount: specifies a maximum receipt limit (in the currency units).
- Min Refund: specifies a minimum refund amount (in the currency units).
- 1 Point Currency Rate: specifies the point’s rate (for example, if a point corresponds to 0.1 of a currency unit, set this field to 0.1).
- Minimum Delivery Amount**: specifies a minimum receipt amount for delivery of orders.
- Free Delivery Amount**: specifies a minimum receipt amount for free delivery of orders.
- Delivery Charge**: specifies the order delivery charges covered by a customer.
**NOTE: For more information on the delivery settings, see How to Set the Order Delivery Charges. - Cash Flow Recalculation: clicking this button enforces the balances recalculation. These calculations use cash flows registered since the account creation date.
- Template for numbering of whole sale: specifies a template for the Wholesale acts numbers.
You can create the template that includes current date, for example: [YYYY]-[MM]-[DD]. In this scenario, the Wholesale acts numbers start with the date of the act creation, for example: 2022-10-20. You can also add a static text to the template. For example, the template [YYYY]-[MM]-[DD]-A: creates the following act number: “2022-10-20-A:”.
TIP: On this page, specify all desired settings and click Update to save your changes.