This topic guides you through the following key tasks for managing inventory items:
- Viewing the inventory items list
- Modifying inventory items
- Adding the inventory categories
- Adding locations
- Adding new inventory items
- Transferring inventory items
NOTE: Before adding new inventory items, you should first create inventory categories and locations where you want to store those items.
Viewing Inventory Items List
To view a list of existing inventory items
- In the left pane of Back Office Management console, expand the Inventory node and click Inventory Items.
NOTE: By default, this opens a list of all inventory items stocked in all registered locations (storage areas). If necessary, use the upper menu bar to filter this list by locations, categories or recipe availability.
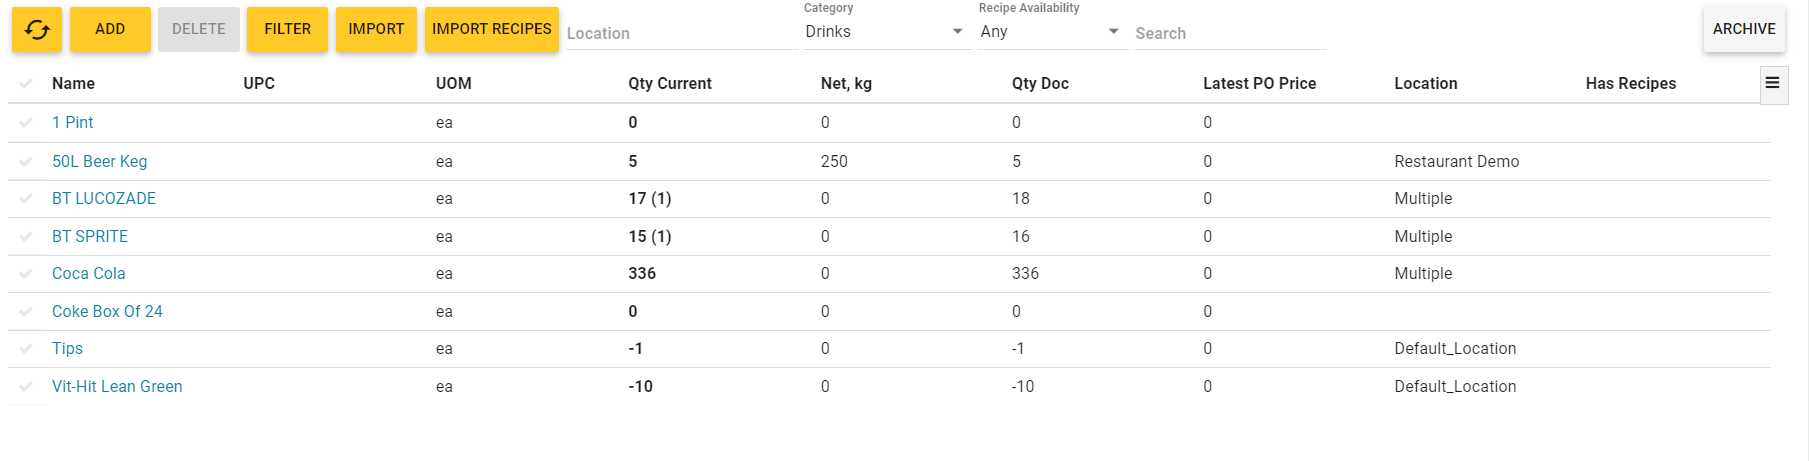
This screen illustrates the inventory items of the Drinks category. In the list, each item has the following fields:
- Name: the item name.
- UPC: the item UPC (Universal Product Code) if specified.
- UOM: a unit of measurements for this item.
- Qty Current: displays current (actual) amount of this item at the location shown in Location field.
NOTE: The number in parentheses displays amount of this item that is reserved for active orders. After closing the orders, the reserved amount will be written-off.
- Qty Doc: displays the documental amount of this item at the location shown in Location field.
NOTE: The documental amount may differ from current amount if you have not applied all documents that refer to inventory operations with this item. - Net: displays current net weight of this item at the location shown in Location field.
NOTE: The net weight is always measured in kilograms. - Last PO Price: displays the last purchase price for this item.
- Location: displays the name of location (storage area) where this item is housed.
NOTE: If this item has been shipped to several locations, this field contains Multiple. - Has Recipes: contains
 icon if this inventory item has a recipe or disassemble recipe.
Modifying Inventory Items
In the list of existing inventory items, you can click the inventory item name to display a tabbed page with the item properties similar to the following screen:
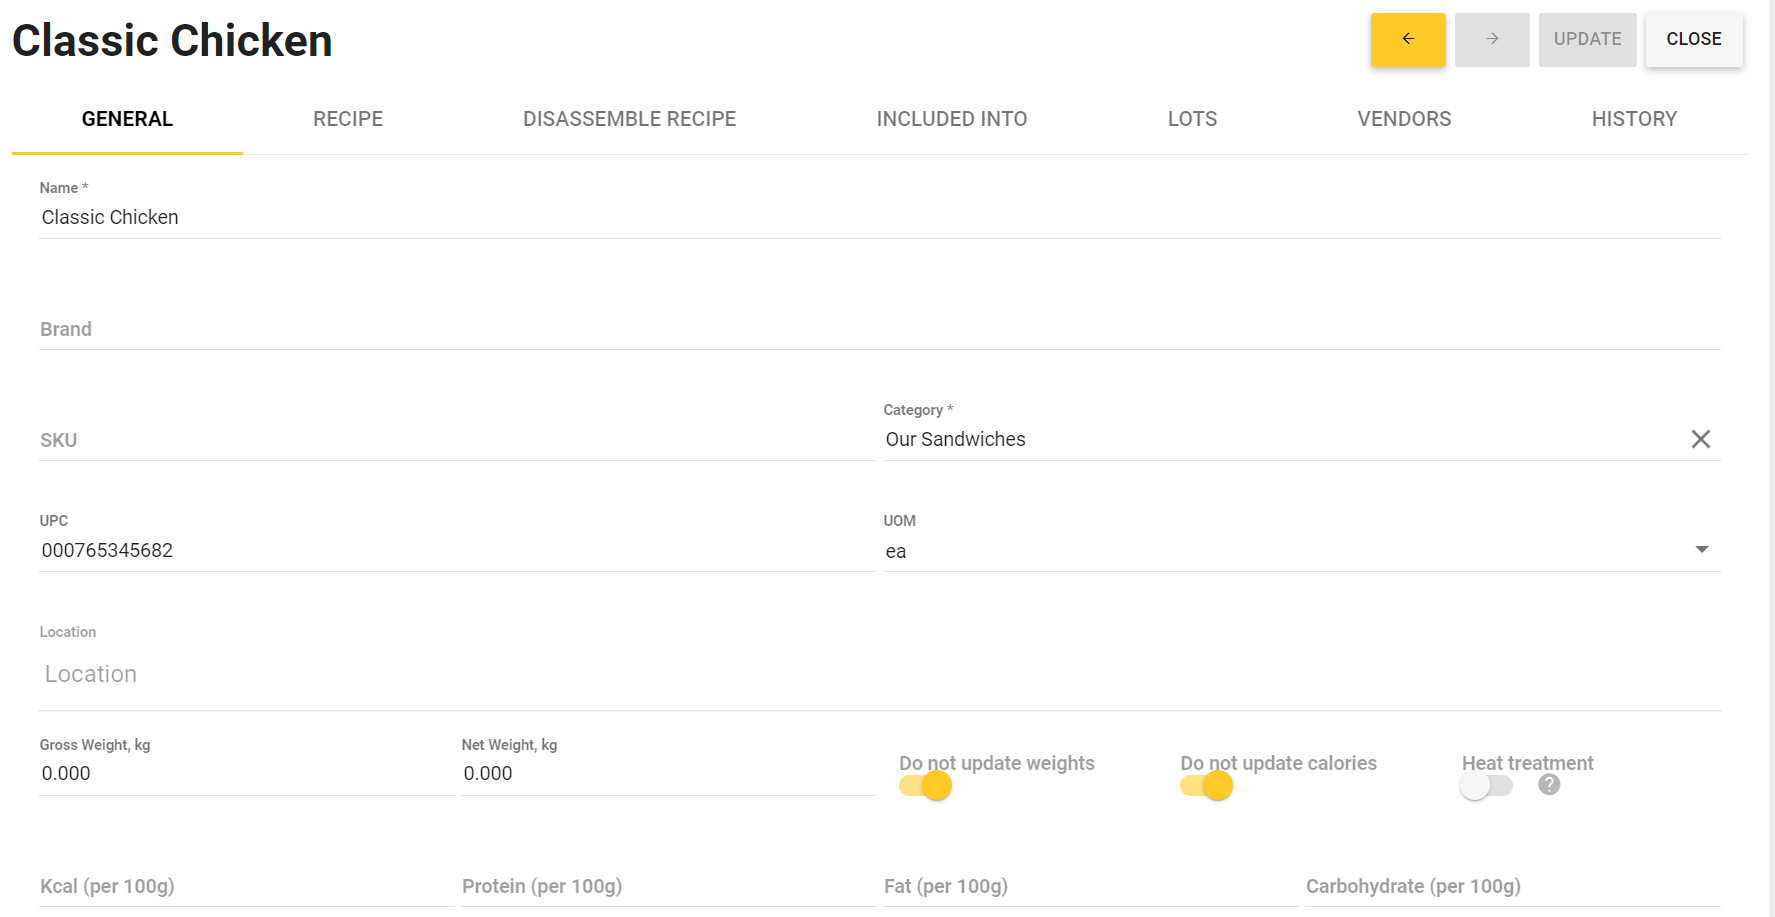
This tabbed page allows you to view and modify information on existing inventory items. For more information, see How to Modify an Inventory Item.
Adding Inventory Categories
To add new inventory category, complete the following steps:
- In the left pane of Back Office Management console, expand the Inventory node and click Categories.
This displays a list of existing inventory categories similar to the following screen:

- Click Add, enter the category name, and click Save.
For more information, see Categories of Inventory Items.
Adding Locations
To add new location (storage area) for your inventory items, perform the following steps:
- In the left pane of Back Office Management console, expand the Inventory node and click Storage Areas.
This displays a list of available locations similar to the following screen:
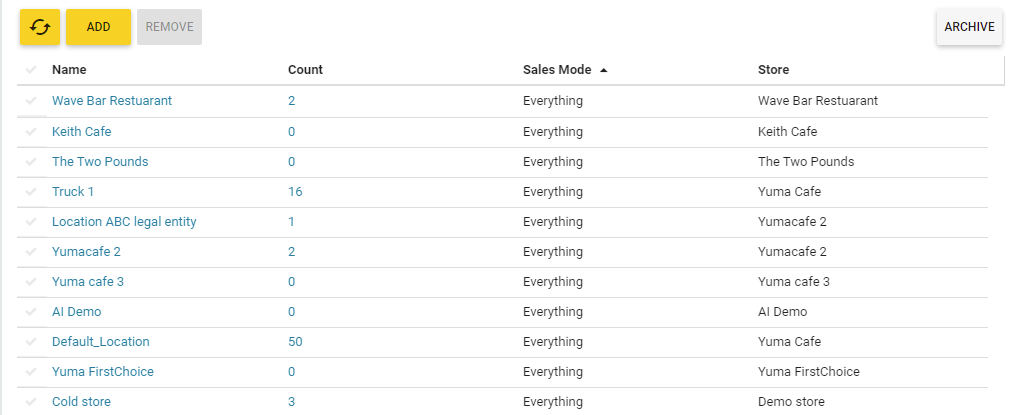
- Click Add, enter the location name, store, and the sales modes, and then click Save.
For more information, see Storage Areas.
Adding New Inventory Items
After you created a category and location to store an item, you can add new inventory item to your stock:
- In the left pane of Back Office Management console, expand the Inventory node and click Inventory Items.
- Click Add and complete the Add form that opens:
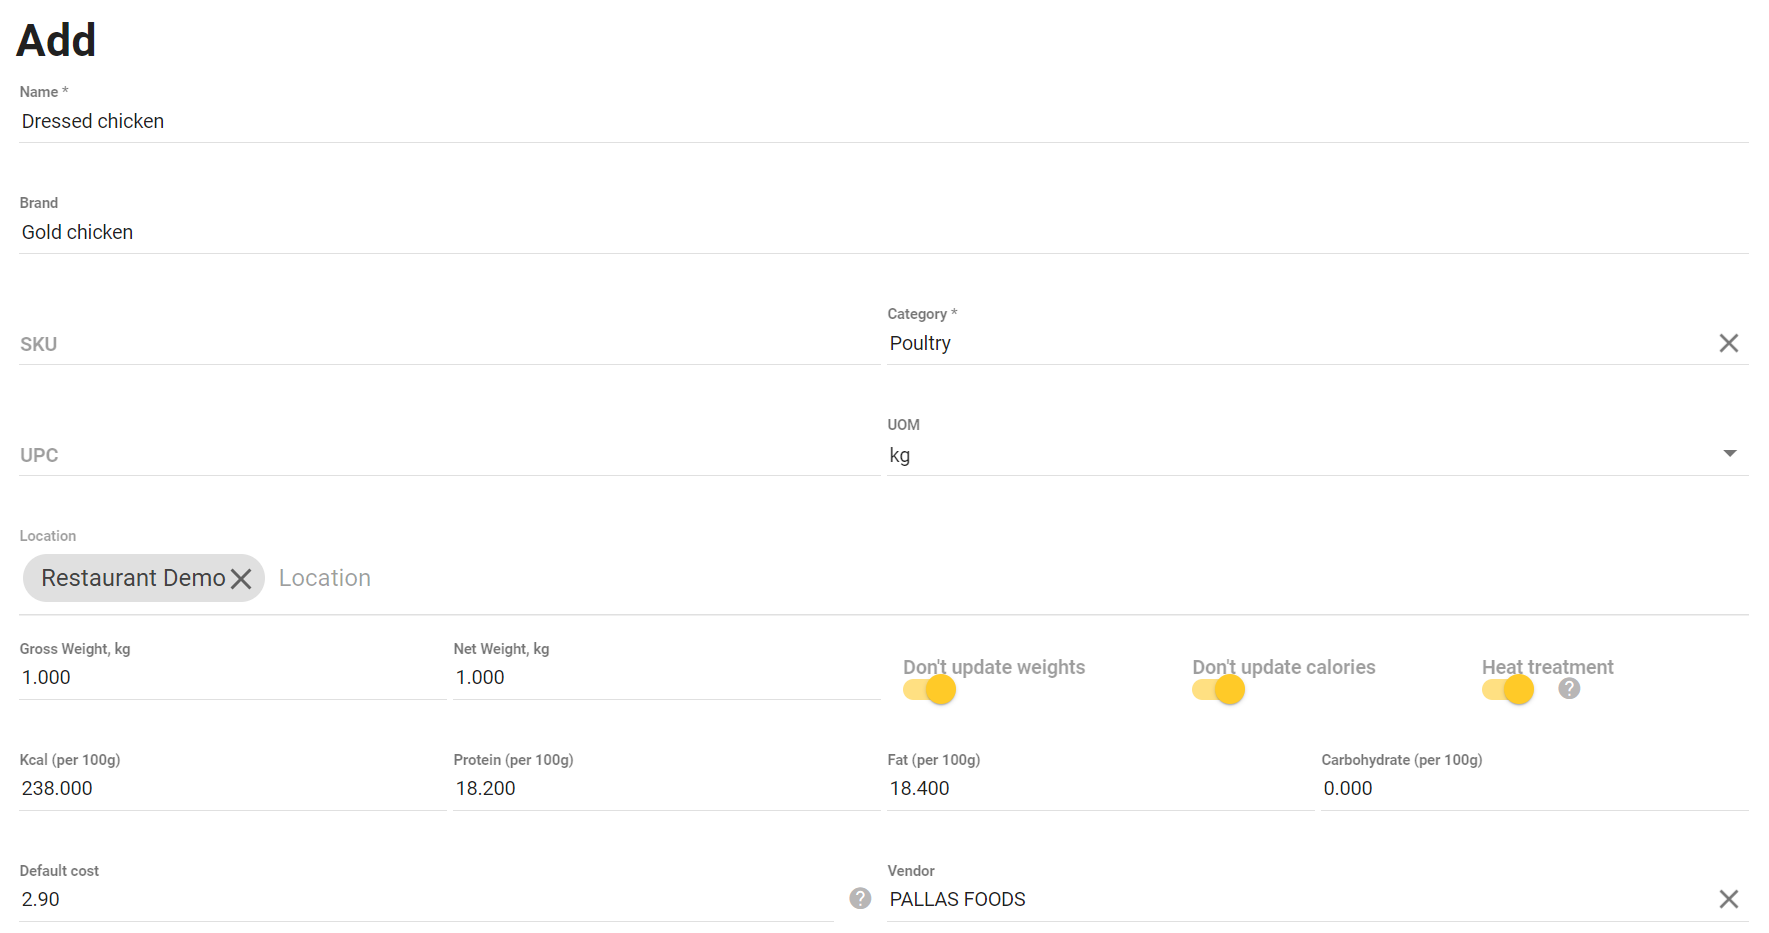
This form defines the following elements:
- Name (mandatory): specifies the inventory item name;
- Brand: specifies the item band;
- SKU: specifies the item SKU;
- UPC: specifies the item UPC (Universal Product Code);
- Category (mandatory): from this list, select the item category.
Important: You can select an existing category from the list, or type in the name of new category, and then click Add in the pop-up window. - UOM: from this list, select the unit of measurements for your item.
- Gross weight, kg: specifies a weight of the inventory item unit that includes the tare weight (always in kg).
- Net weight, kg: specifies a net weight of the inventory item unit (always in kg).
- Don’t update weights: when turned on, YumaPOS uses the Net weight and Gross weight values specified in this form. Otherwise, the values of those parameters are taken from the product recipe.
- Don’t update calories: when turned on, YumaPOS uses the nutrition and energy values of this product specified in this form. Otherwise, the values of those parameters are taken from the product recipe.
- Heat treatment: when turned on, the coefficients of loses that are caused by the product heat treatment are applied. For more information, see How to Set an Energy and Nutrition Values of Foods
- Kkal (per 100 g), Protein (100 g), Fat (per 100 g), and Carbohydrate (per 100 g): in these fields, specify appropriate values of those parameters per 100 g of a product.
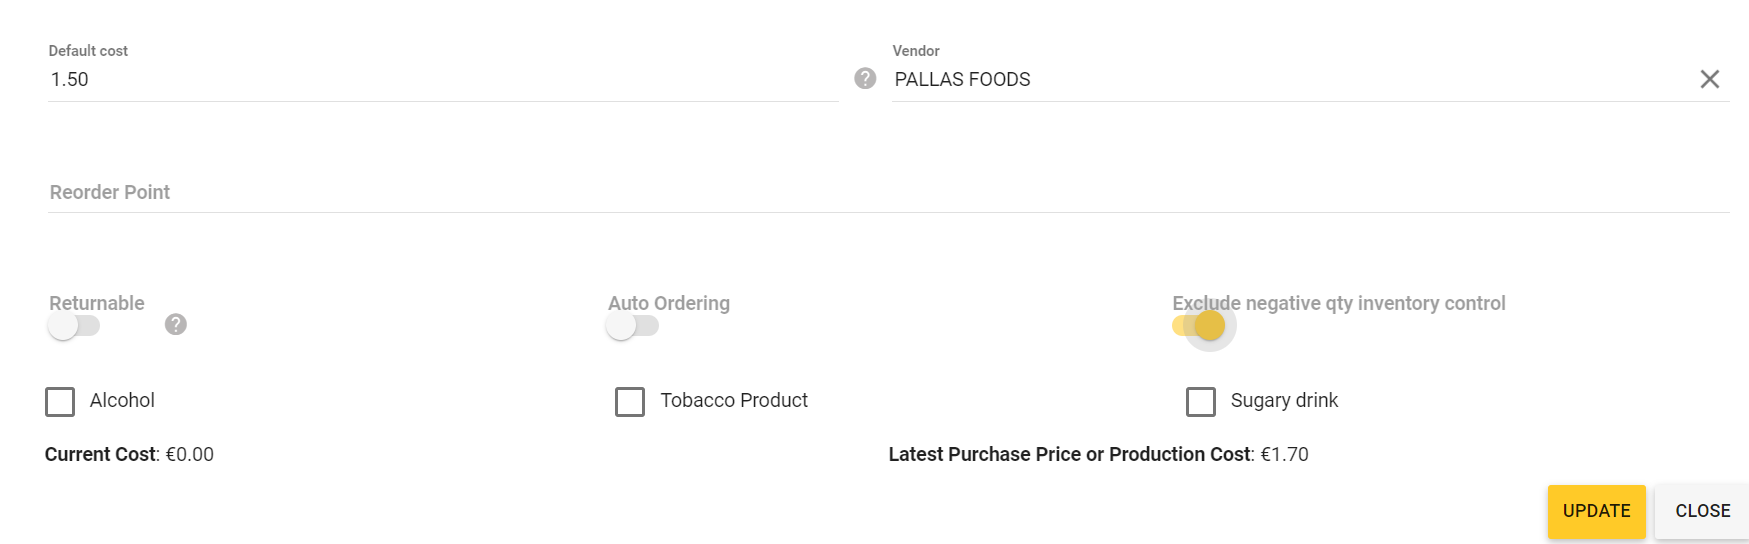
- Default cost: specifies the default cost of the product unit.
- Vendor: specifies the product vendor. In this field, select the vendor name from provided list, or type in the vendor name.
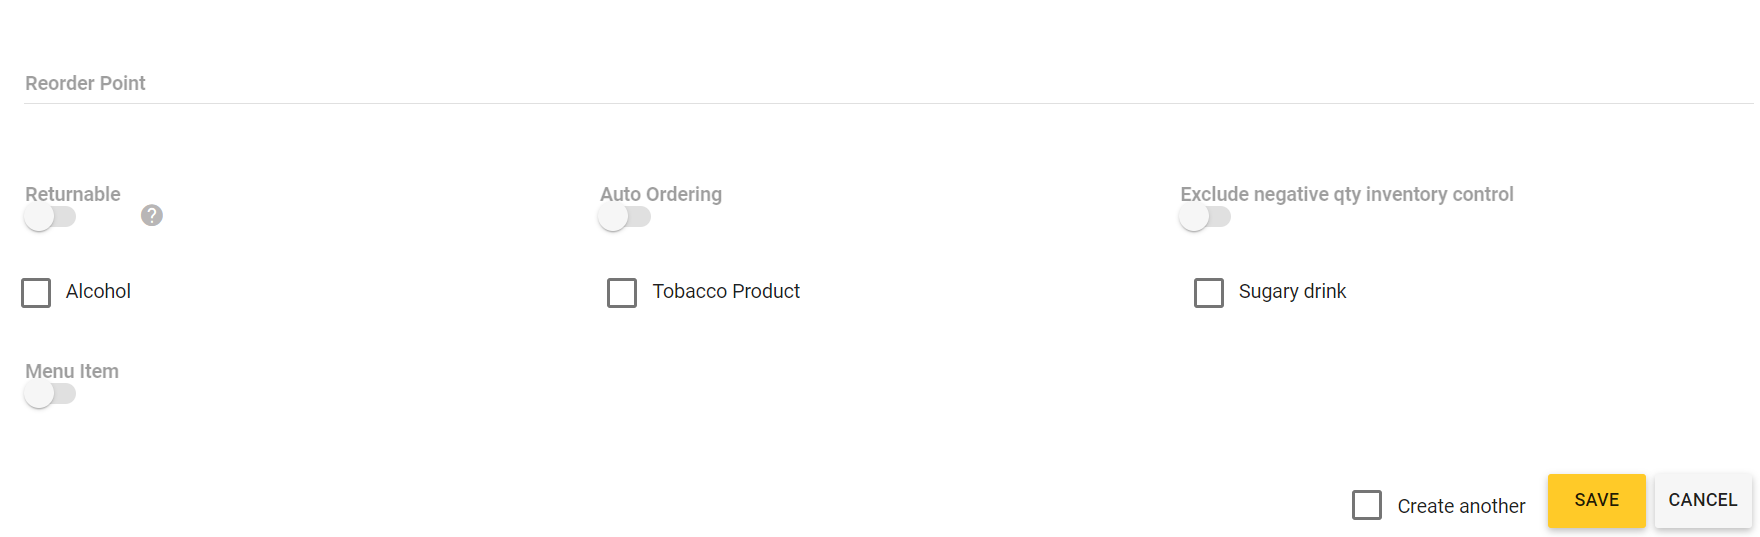
- Returnable: when enabled, after refunding an order that includes this inventory item as a component of recipes, the write-off operation is cancelled. You can again sell this inventory item.
- Exclude negative qty inventory control: turn on this switch button to allow using negative quantaties of product.
- Alcohol, Tobacco Product, and Sugary Drink: select an appropriate checkbox if the inventory item belongs to these categories of products.
- Menu Item: when ON, automatically adds this item to menu items list. Clicking this element adds the following controls to the Add form:
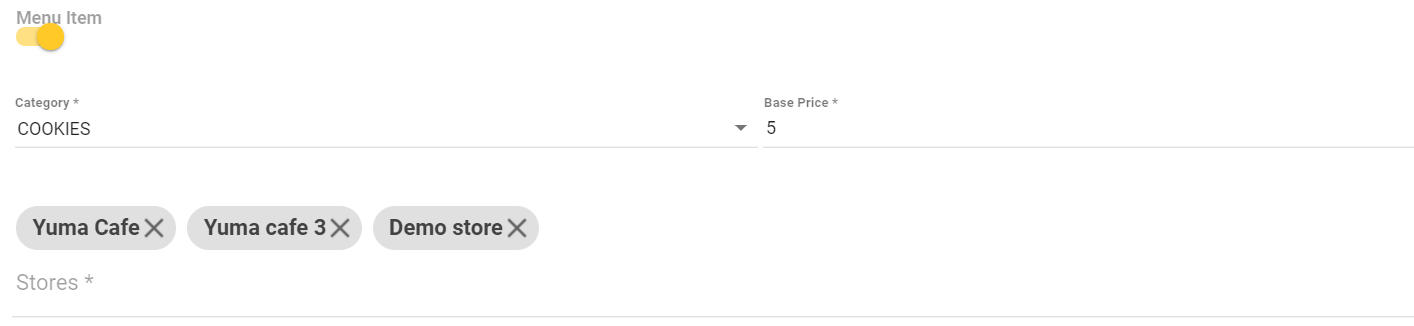
- Category (mandatory for menu items): from this list, select a menu category to which to add this item.
- Price: specifies the menu item price;
- Stores: To this list, add the stores where this menu item is available.
- Click Save.
Commands of Items List Menu Bar
The Inventory Items list has the top menu bar:

The following menu commands are available:
- Add: adds new inventory item;
- Delete: deletes selected item(s) from the list;
- Filter: allows you to filter the items list by specific criteria (see later in this paragraph);
- Search: start typing a search key to display only items that match the search key;
- Import: click to import inventory items from an XLSX file.
NOTE: YumaPOS prompts you to download the XLSX file template. - Import Recipes: click to import inventory recipes from an XLSX file.
NOTE: YumaPOS prompts you to download the XLSX file template. - Location, Category: allow you to filter the items list by these criteria.
For example, if you select Drinks from the Category list, the Inventory Items list will contain only drinks; - Recipe Availability: allows you to display inventory items with recipes, without recipes, or both.
- Archive: click to restore deleted inventory items.
Filtering The Menu Items List
To filter the menu items list by specific criteria
- In the menu bar, click Filter, and complete the Filters popup dialog box:
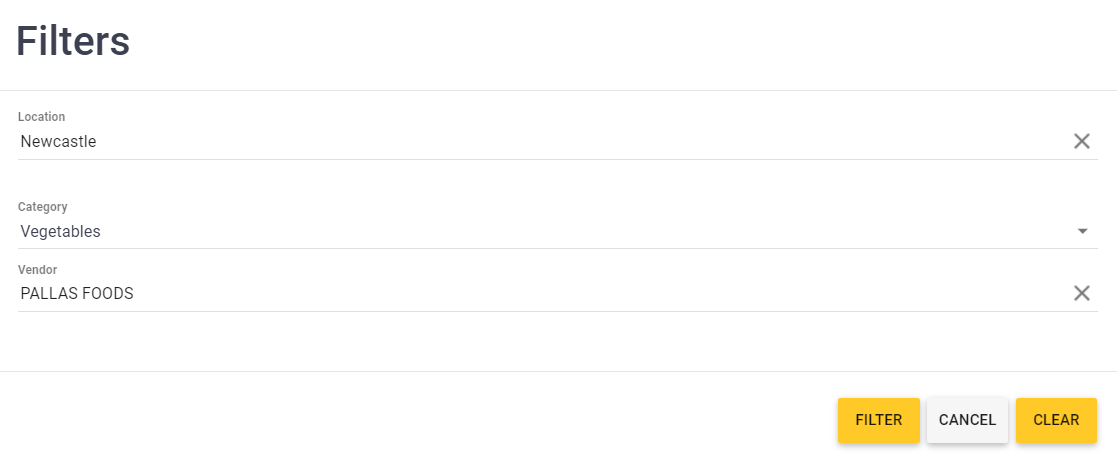
In this example, the filter causes YumaPOS to display only vegetables that are stored in the Newcastle storage area and purchased from Pallas Food company.
Transferring Inventory Items
You can transfer inventory items from one location to other location. For more information, see Acts of Transfer.
See also