Overview
Back Office lets you create manual discounts such as 10% off an order to apply them in the checkout screen of POS Terminal applications. Due to role-based control, you can define which members of staff are allowed to apply discounts.
You can view a list of registered discounts. Additionally, you can add new discounts or edit existing discounts.
This topic covers the following tasks:
View a List of Discounts
To view a list of registered discounts
- In the left pane of Back Office Management console, expand the Marketing node, and then click Discounts.
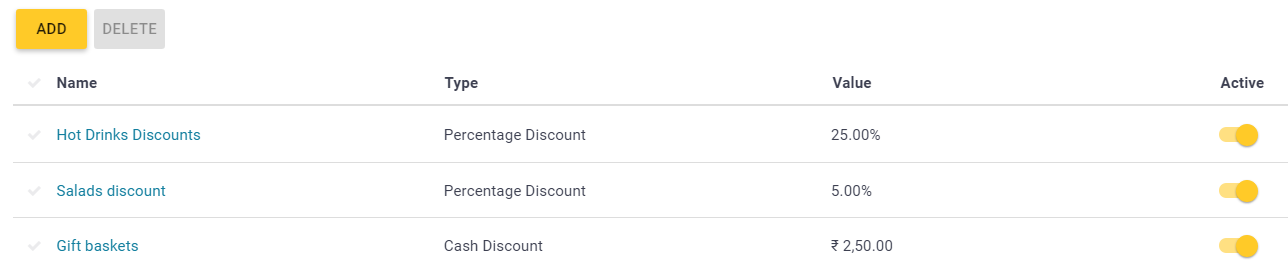
This page defines the following elements:
- Add: adds new discount
- Active: makes the selected discount active
- [Name column]: click the discount name to edit it.
Add New Discount
To add new discount
- In the Discounts list, click Add.
This opens the Add Discount form similar to the screenshot from Step 2. - Complete the Add Discount form and click Save:
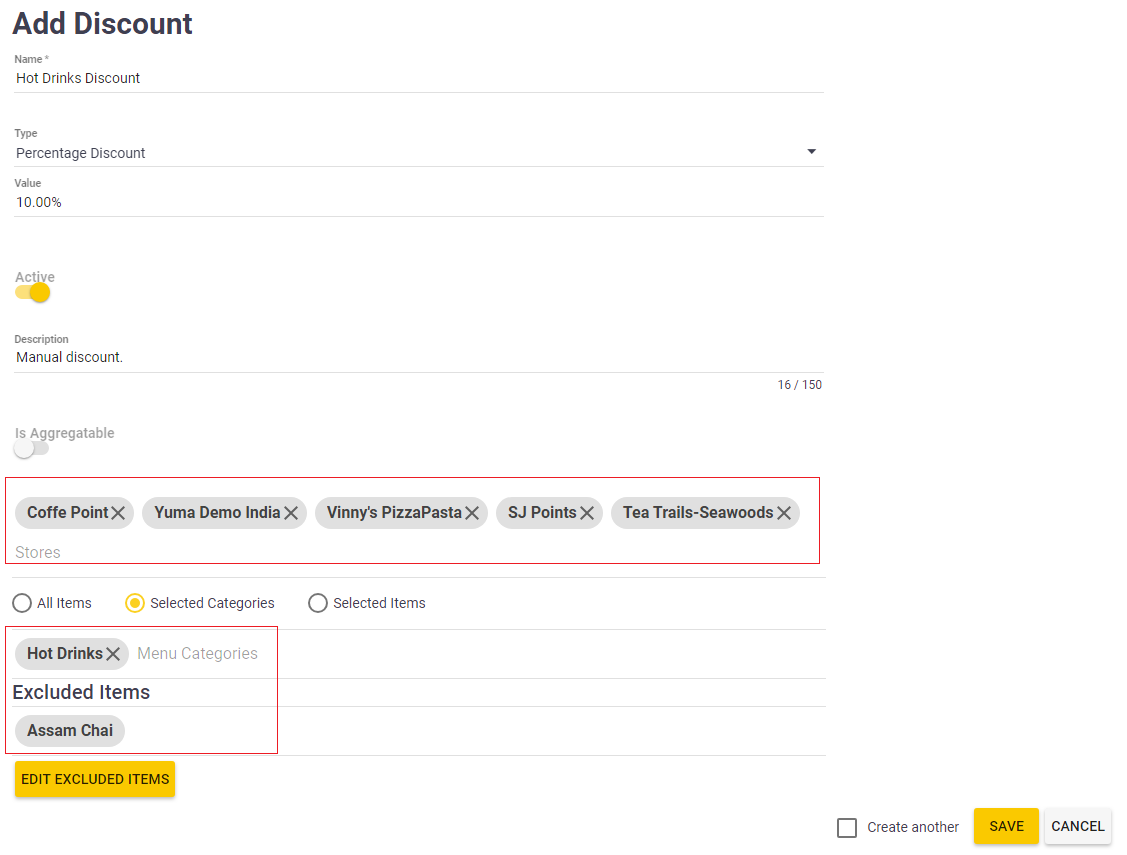
On this page, use the following elements to configure newly created discount:
- Name: in this text box, specify the discount name to be displayed on the payment screen of POS Terminal app.
- Type: from this list, select the discount type (possible discount types: Percentage Discount or Cache Discount).
- Value: speciy the discount value (in percentage or in currency units).
- Active: turn on this toggle button to make this discount active.
- Description: enter here any optional description of this discount.
- Is Aggregatable: turn on this toggle button to let this discount combine with other existing manual discounts.
- Stores: in this list, retain only stores where this discount applies.
NOTE: By default, this list includes all your registered stores. - Specify the target items or menu categories to which this discount applies:
- All Items: select this option to apply this discounts to all menu items.
- Selected Categories: select this option and then specify menu categories to which this discount applies.
NOTE: Optionally, you can exclude some items from selected categories. - Selected Items: select this option and then specify menu items to which this discount applies.
To clarify this procedure, consider the above sample Add Discount form. This form lets you configure a 10% discount that applies to all drinks from the Hot Drinks category except Assam Chai, in the following stores: Coffe Point, Yuma Demo India, etc.
Edit Existing Discount
To edit a discount
- Open the list of discounts (see View a List of Discounts earlier in this topic).
- Click a discount name to start editing it.
- Edit the discount properties in the form that opens, and then click Update to save your changes.
NOTE: This form is similar to the Add Discount form described in the “Add Discount” section earlier in this topic.
Delete Discounts
To delete discounts
- From the list of discounts, select discount(s) to delete, and click Delete.
NOTE: This operation permanently deletes selected discounts. To temporarily suspend selected discounts, turn off their Active toggle buttons.
See also
- Promotional Campaigns
 watch our help video about the use of the discounts feature: